
Using the Subjects Tab in a Job
Learn how to filter, find, edit, and delete Subject Data and Images in the Subjects Tab
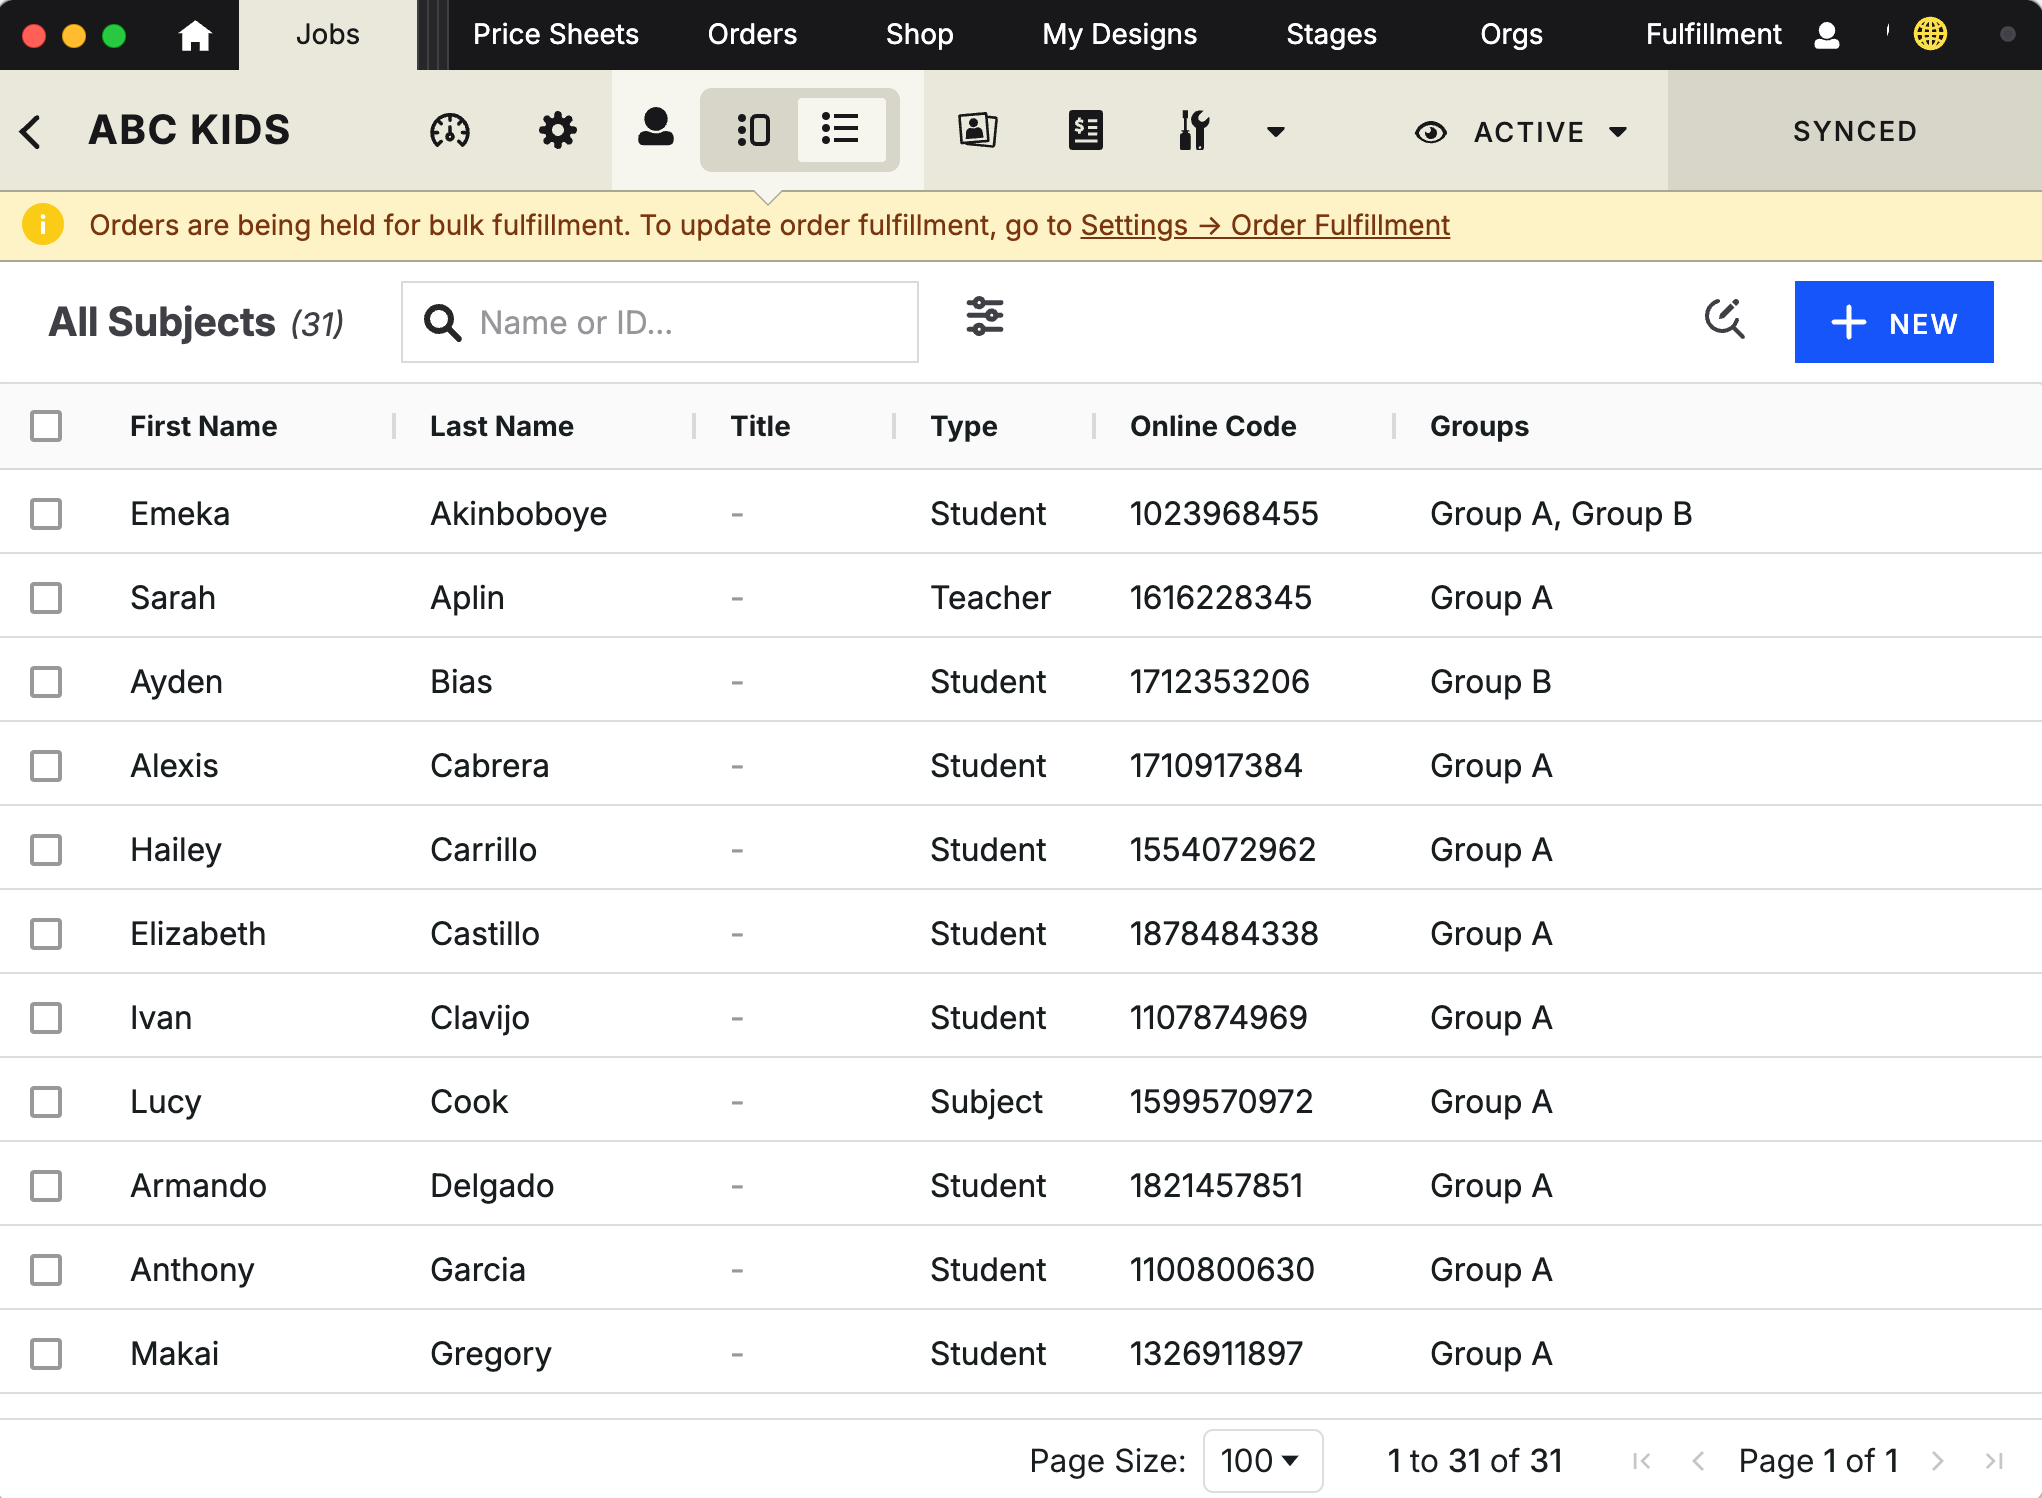
What is the Subjects tab?
The Subject Tab contains all Subject information in a Job. It's here that you can add, edit, and delete Subjects in a variety of ways. To open the Subjects tab, click on the Subject Icon in the Navigation Bar.


In this tab, you'll be presented with Subject Images, Data, and Orders all in one view.
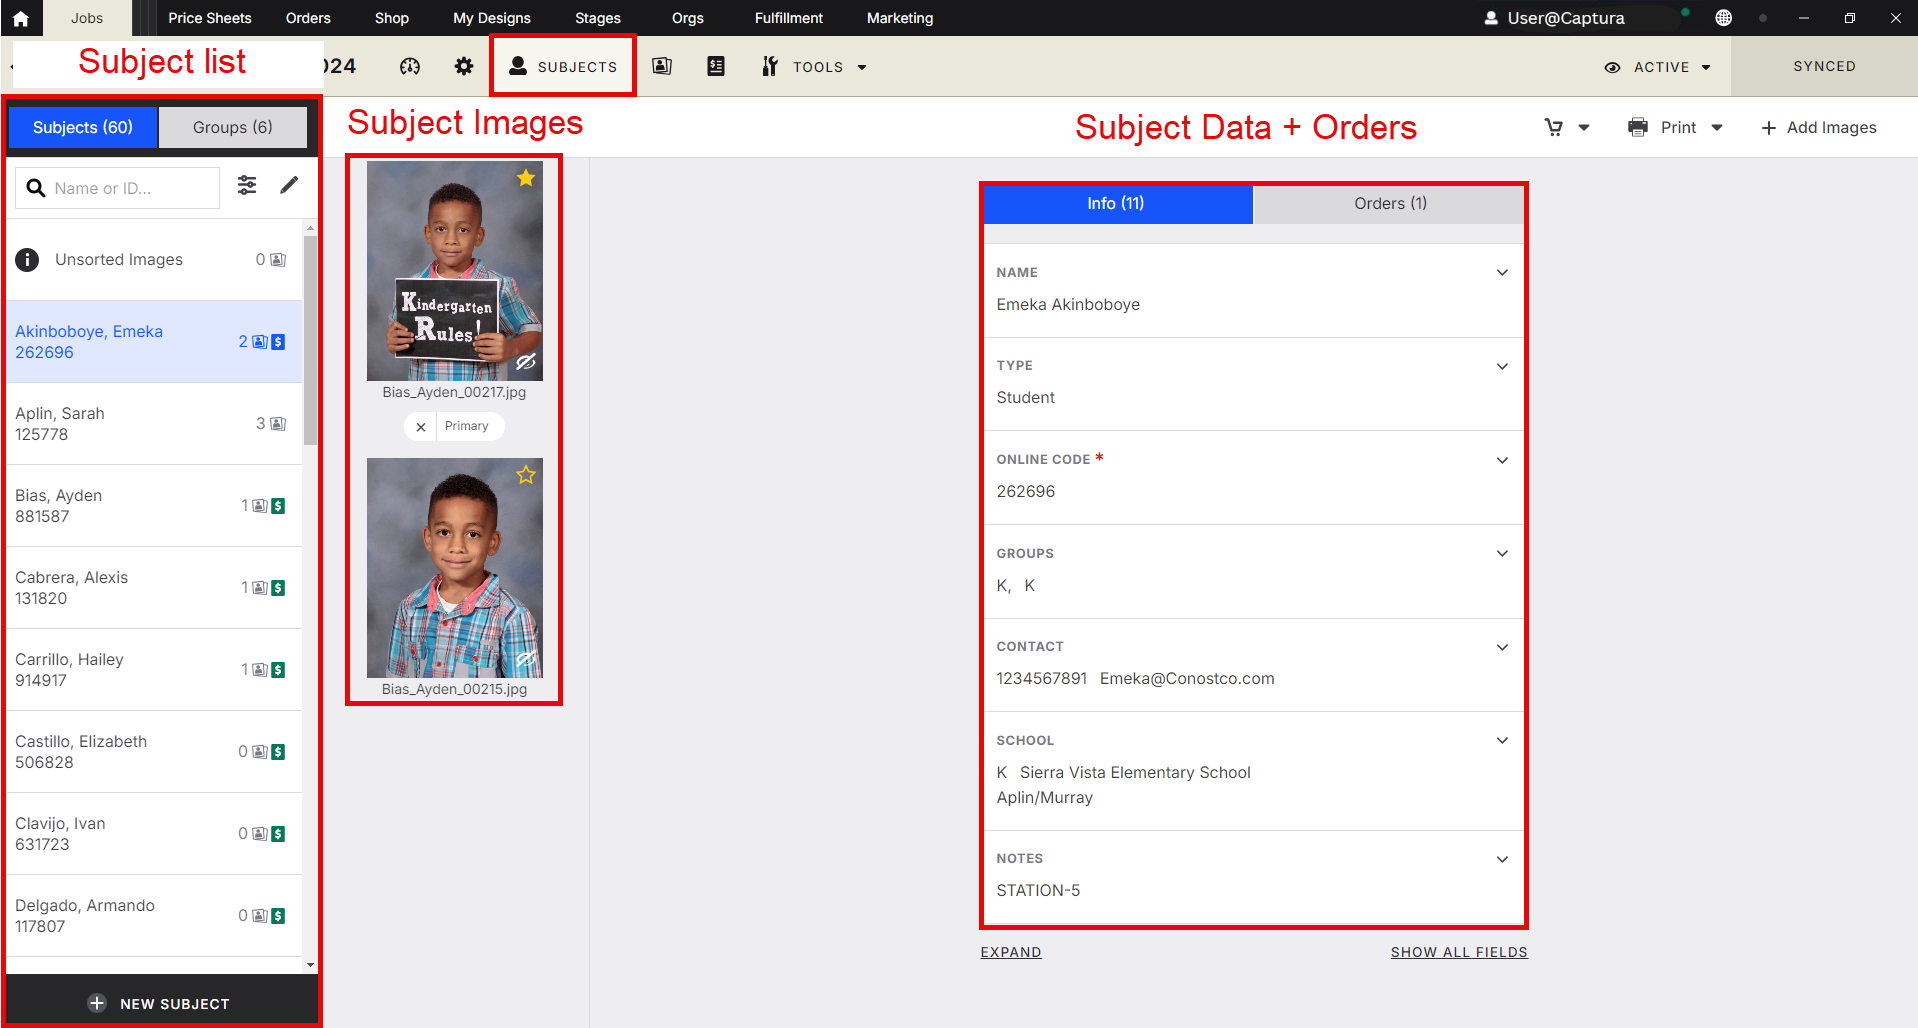
The Subject List
The Subject List on the far-left side of the screen allows you to scroll (or search) through the list to find and edit any subject or group in the Job. Click on a Subject to bring up their information on the right-side of the screen.
You can also apply filters to return a specific list of Subjects using a combination of subject data and image metadata.
Pro Tip: You can export the Subject Data from your filtered results into a .csv file. You can then use the same .csv to make any needed updates to the Subject Data and merge the updated .csv back into the Job.
Adding Subjects
Need to add 1 or 100 more subjects to the Job? No sweat! Click or tap on the + New Subject button at the bottom to begin. You'll be prompted to enter in either specific subject information for a single subject or you can add a custom range of "blank" subjects as placeholders.
Need to delete a Subject? Click on the Pencil icon next to the filter button to bring up the delete option next to your Subjects.
Viewing and Editing Subject Data
All of the Subject Data can be found on the right-side of the window in this tab. Once we've selected a Subject from the Subject List, we can tab between their Subject Data (Info) or Orders. We can also add, edit, or remove any data as needed.
Manipulating Subject Images
Need to add images to a subject? Maybe move a range of images from Subject A to Subject B? Did the Subject blink and now we have to hide a bad image from appearing online? All of this and more through some natural motions and clicks.
Managing Subject Data with Sheet View, Find and Replace, and Quick Edit
Managing large sets of subject data doesn’t have to be slow or complicated. With Sheet View, Find and Replace, and Quick Edit, you now have three powerful ways to clean, update, and standardize subject data in minutes — not hours.
Manipulating data in Sheet View
Sheet View displays your subjects in a spreadsheet-style grid, giving you a familiar, high-performance way to edit data.
With Sheet View, you can:
Switch from Detail View to Sheet View instantly.
Edit fields directly in the grid with inline editing.
Apply bulk updates using Quick Edit or Find & Replace.
Manage thousands of subjects with pagination and performance optimizations.
What is Find & Replace?
Find & Replace is a sidebar tool that lets you search and update subject data in bulk. Instead of editing one subject at a time, you can locate all matches across your dataset and replace, format, or append values at once.
With Find & Replace, you can:
Search across any subject field using operators like includes, equals, starts with, ends with, or all.
Replace matching values with new text.
Append or prepend text to existing values.
Standardize formatting (e.g., capitalization, spacing, phone number formatting).
Run changes across the entire dataset or only filtered results.
What is Quick Edit?
Quick Edit is your shortcut for editing the most common subject fields across multiple records at once.
With Quick Edit, you can:
Select multiple subjects and open the Quick Edit sidebar.
Update fields like names, contact info, addresses, grades, and custom fields.
Standardize grade formatting automatically (e.g., “9th” → “9”).
Use cascading country/state dropdowns for accurate addresses.
Save changes instantly with visual confirmation.
Quick Edit is ideal when you need precise, controlled updates for a selected group of subjects.
Choosing the right tool
Here’s how the three tools fit together:
Sheet View gives you the flexibility to see and edit everything at once.
Find and Replace is best for sweeping changes across your dataset (search + update in bulk).
Quick Edit is best for targeted updates across a selection of subjects.
For example:
Use Sheet View to filter subjects by grade.
Open Find & Replace to standardize all selected grade values (e.g., “9th” → “9”).
Watch changes update instantly in the grid with clear save indicators.
Step-by-step: using Sheet View
Open a Subject Gallery.
Click the arrow next to Subjects in the navigation.
Select Sheet View.
Edit any cell directly (click → type).
Use checkboxes to select multiple rows and apply bulk actions like Quick Edit or Delete.
Click Sync to save all changes.
Step-by-Step: using Find and Replace
In Sheet View, click the Find and Replace icon in the header.
Select the field you want to search (e.g., First Name, Grade, Organization).
Choose an operator (e.g., includes “John”).
Choose an action (e.g. Replace Text, Add Text, or Format)
Enter the replacement text, added text, or formatting rule.
Click Apply. Changes update immediately across all matching records.
Click Sync to save all changes.
Pro tips
Use filters in Sheet View to narrow down your subjects before running Find & Replace.
Combine Quick Edit for small adjustments with Find & Replace for larger bulk changes.
Use the Sort & Filter menu to narrow down subjects that need editing.
Keep an eye on the sync status indicator to confirm all edits have saved.
Remember: archived or expired galleries remain read-only, even in Sheet View.
Why use these tools?
Together, Sheet View and Find and Replace save hours of repetitive editing. Whether you’re:
Correcting spelling errors,
Standardizing grades,
Cleaning up phone numbers or addresses,
Or updating contact info in bulk,
Adding Images outside of Captura Workflow to a Subject
Simply drag-and-drop an image into the Image List in between the Subject List and the Subject Data view.
You can also click on the + Add Images button to open browse to the file location.
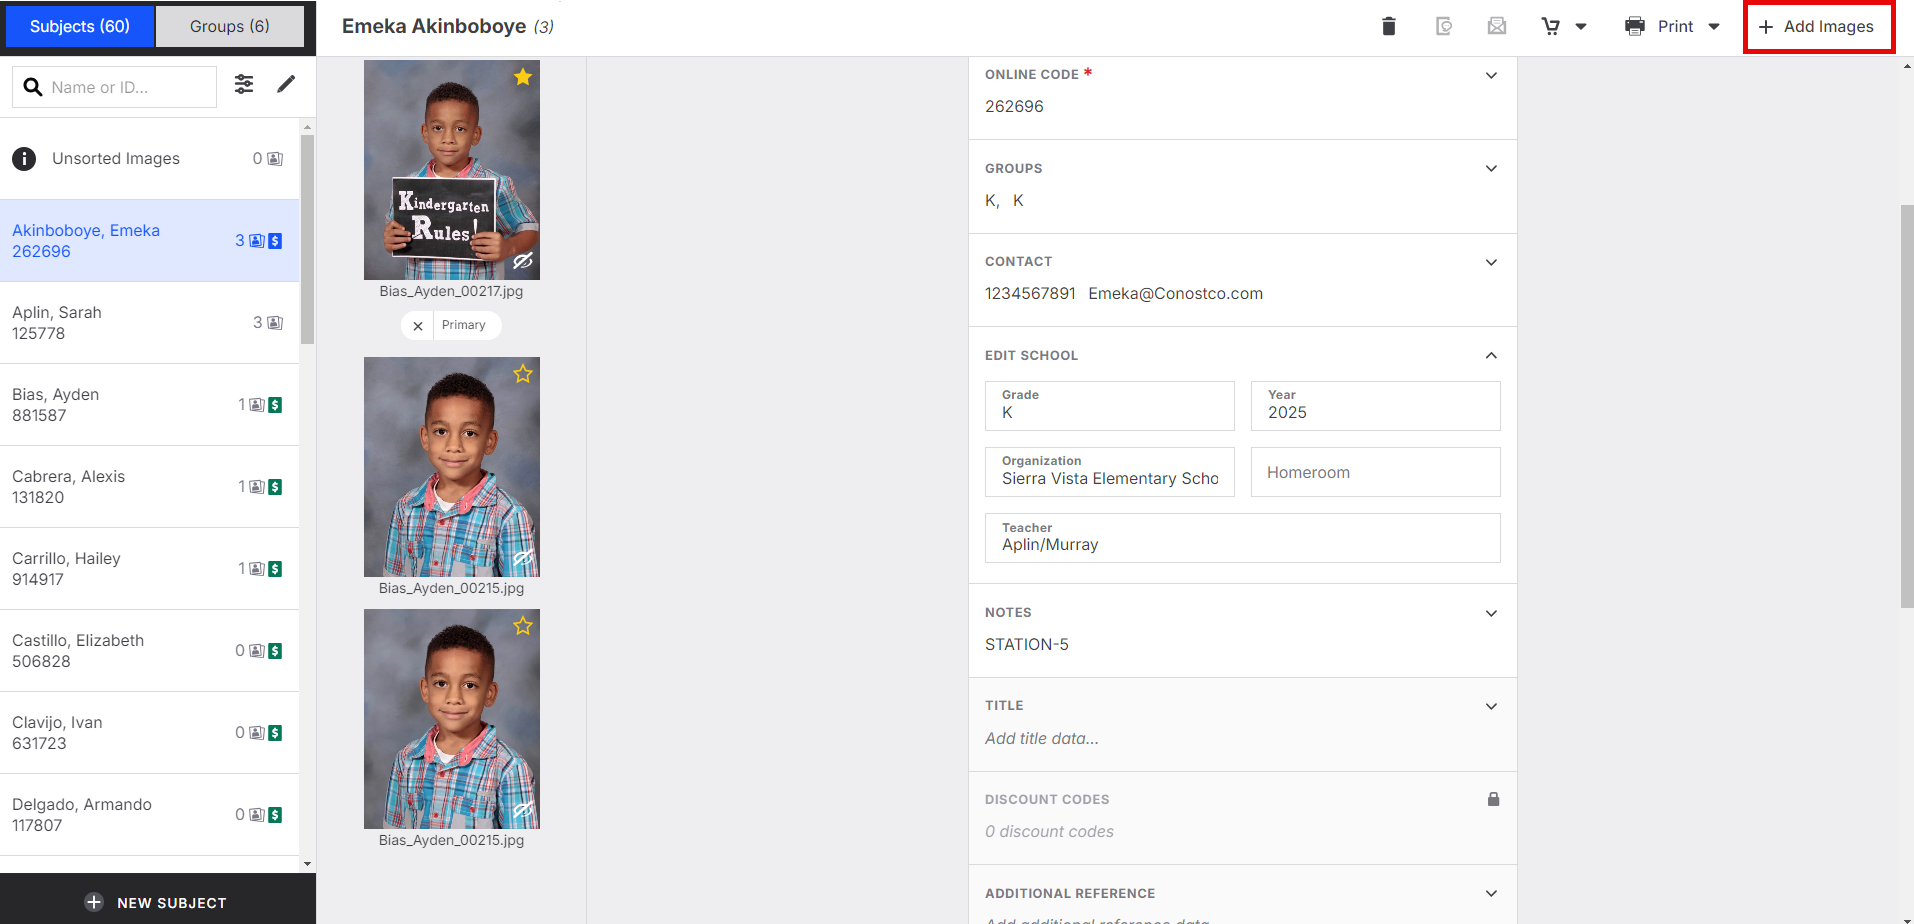
Pro Tip: You can use keyboard commands like Ctrl + A to select all images in a folder and upload them all together.
Adding images inside of Captura Workflow to a Subject
Sometimes, images get assigned to the wrong Subject. To move them around, simply click on the images you wish to select, then click on Move in the Menu bar to select the correct Subject.
Pro Tip:
Moving Multiple Images in the Camera Roll
Organizing your Camera Roll can be frustrating when you have a lot of images. Luckily, with the new update, you can move multiple images quickly and easily!
Instructions
After selecting your images to move, you can also drag-and-drop an image to move the entire selection to the correct Subject
Conclusion
Organizing your Camera Roll should now be easier with the new update from our team. We hope this article was useful in helping you quickly move multiple images!

Primary, Yearbook, and Hidden Image Types
Click on the ellipses (...) to bring up a checklist and specify if the image should be a Primary, Yearbook, or Hidden Image. Hidden images will appear distinctly light to help easily identify at a glance. Yearbook Selection (as well as Primary and Hidden tags) appear underneath the selected image.
You can identify Primary Images quickly by looking for the full gold star in the top-right corner of the image. The Primary Image selection can be toggled by clicking an empty star in the top-right corner of a picture.
NOTE: While an image can be both a Primary and a Yearbook image, a Hidden Image is only a hidden image.
Delete an image from Captura Workflow
Simply click on the image or images you want to delete and select Delete from the Menu bar that appears.
Don't forget to sync your edits into the cloud! It'll make the changes readily available on every machine you use in Captura Workflow.