
Using Stages in Captura Workflow
Brief Overview
Stage Templates allow you to automate shopping cart settings throughout the lifecycle of a job. You can create multiple stages to control when customers can place orders, which pricing applies, and how the shopping cart behaves at different points in your workflow.
Overview & Objective
Stages help studios manage the different phases of a job without manually updating shopping cart settings each time.
For example, you can create stages for:
Pre-Orders: Allow customers to place orders before images are available.
Production and Editing: Pause ordering while images are being processed.
Re-Orders or Proofing: Reopen the shopping cart for customers to view images and place orders.
Promotions: Apply different pricing or shopping cart settings during a promotional period.
Each stage can control:
Stage duration and scheduling
Shopping cart visibility
Price sheet
Shipping, tax, and watermark settings
Custom forms
Pre-order availability
Bulk hold settings
Stage Templates can be created for a single job or reused across multiple jobs that follow the same workflow.
❗ IMPORTANT: Version Compatibility
Adding a Stage to a job will prevent that job from syncing for users running the Fall Seasonal Release or Captura Workflow versions older than 2024.2.7.
We recommend coordinating the adoption of Stages across your entire studio. All users should update to the latest Captura Workflow release before using this feature to avoid syncing issues.
To access the latest release:
Open Preferences.
Navigate to Advanced.
Select Latest Releases.
Note: Stages are only available with Smart Workflow.
Setup / Configuration
Creating a Stage Template
Navigate to Stages.
Click New.
Enter a name for your Stage Template.
Click Create.
The first stage will be created automatically.
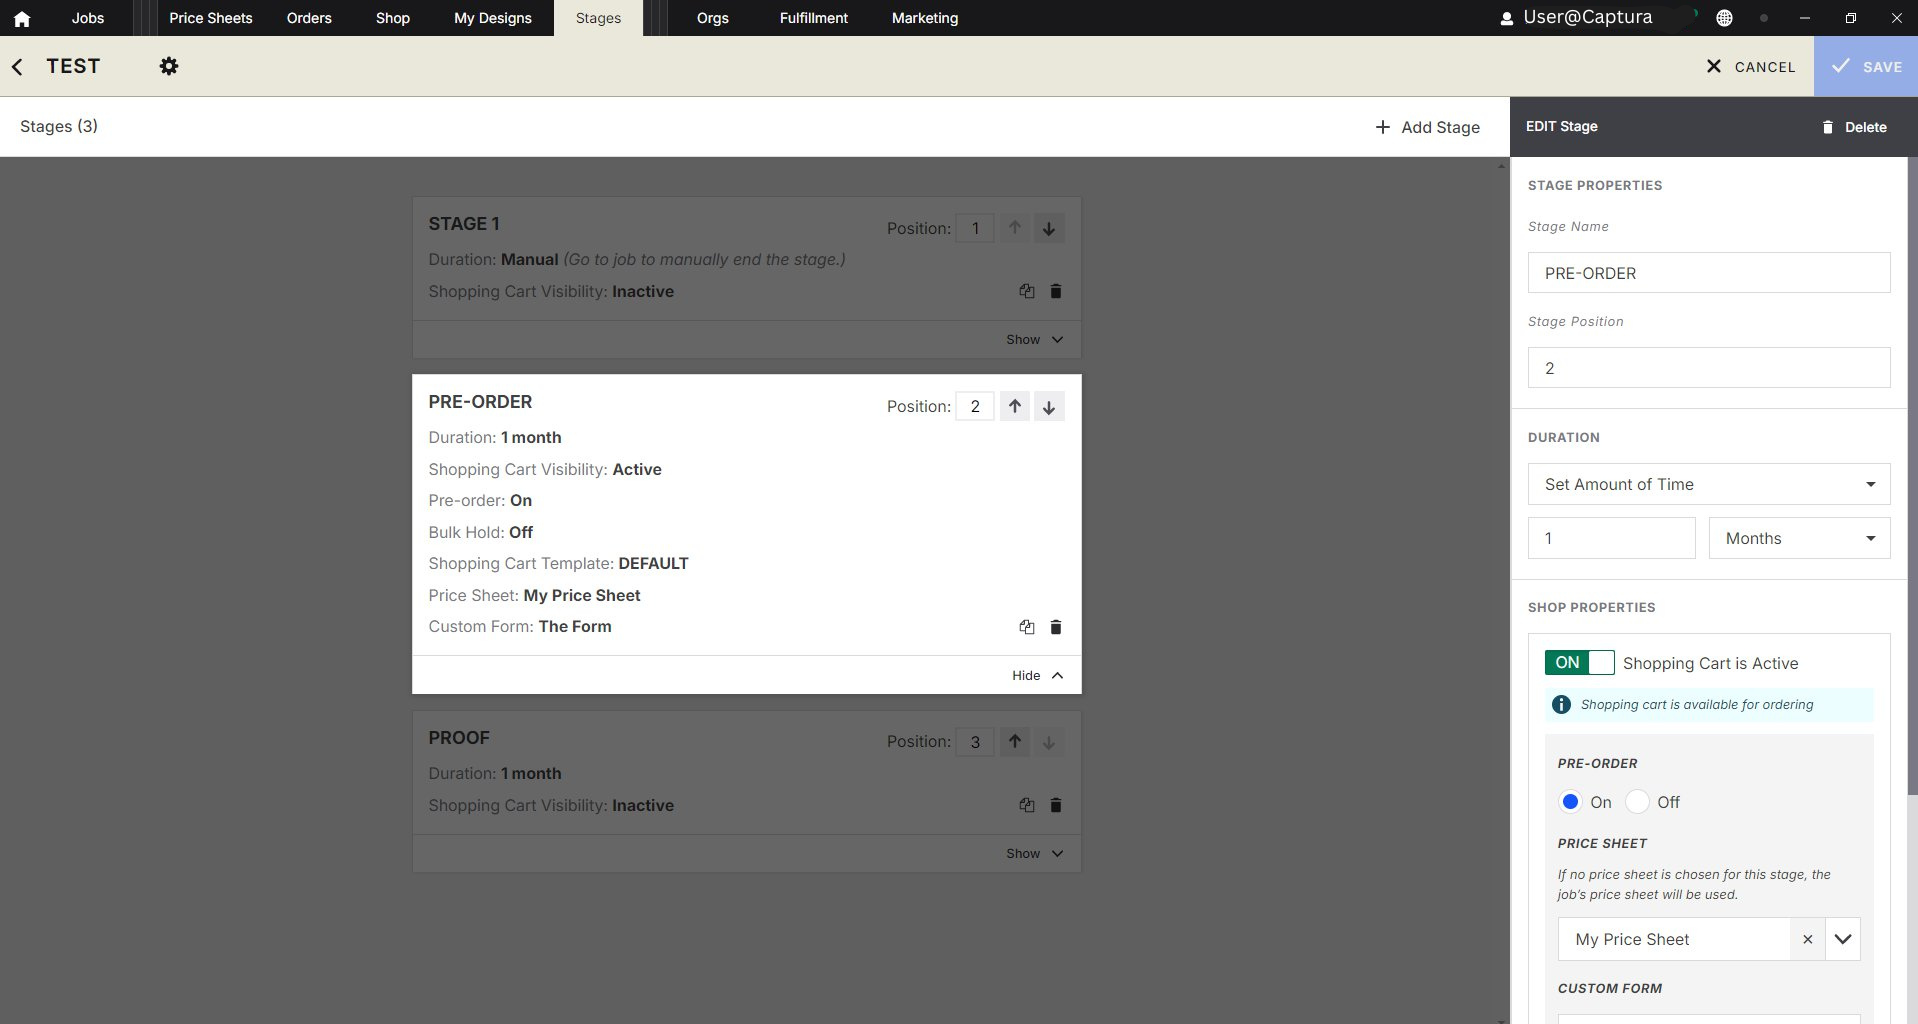
Use the Stage Properties panel on the right to configure the stage.
Click Add Stage to create additional stages for the job lifecycle.
To manage the sequence, you can:
Duplicate an existing stage.
Delete a stage that is no longer needed.
Change the position of a stage to adjust its order.
Click Save when finished.
Configuring Stage Properties
Each stage has its own settings that determine when it becomes active and how the shopping cart behaves.
Stage Position
Stage Position determines the order in which stages run. Jobs move through stages sequentially based on their configured position and duration.
Stage Duration
Duration determines how long a stage remains active.
You can choose from four duration options:
Duration Type | Description |
|---|---|
Set Amount of Time | Runs for a specified number of months, weeks, days, or hours after the stage becomes active. |
Specific Date | Runs until a selected calendar date. |
Dynamic Job Date | Uses a date configured within the job, with an optional number of days before or after that date. |
Manual | Remains active until someone manually starts the next stage. |
Available Dynamic Job Dates
Event Date
Yearbook Due Date
Retake Date
Custom Date 1
Custom Date 2
Expiration Date
Start Direct Shipping Date
If a stage uses a Dynamic Job Date that has already passed, that stage will be skipped. The job will move to the next sequential stage with a future end date.
Shop Properties
Shop Properties control how the shopping cart behaves during each stage.
You can configure:
Whether the shopping cart is active and available for ordering.
Whether pre-ordering is enabled.
Which price sheet applies.
Which custom form is used.
Applicable cart settings, including shipping, tax, and watermarks.
Bulk hold settings.
If a price sheet is not selected for a stage, the job's default price sheet will be used.
❗ IMPORTANT: Changes made to a Stage Template will not automatically update stages already assigned to existing jobs. To apply the updated settings, you must remove the Stage Template from the job and then re-add it.
❗ IMPORTANT: Direct Shipping Date Override
The Direct Shipping Date configured in the job's Main Settings takes priority over all Stage settings.
If a Direct Shipping Date is set in Main Settings, it will override any conflicting shipping dates or shipping-related settings configured within individual stages.
When configuring Stage Templates, check the job's Main Settings first to ensure the Direct Shipping Date aligns with your intended workflow.
Step-by-Step Instructions
1. Assigning a Stage Template to a Job
Once you have created a Stage Template, you can assign it to a job.
Navigate to the Job you want to configure.
Click Job Settings (gear icon).
Scroll down to ADD STAGE TEMPLATE.
Select the required Stage Template from the drop-down menu.
Click Sync to save your changes.
The selected Stage Template will now be assigned to the job.
2. Viewing Stages Assigned to a Job
To view the stages currently assigned to a job:
Open the Job.
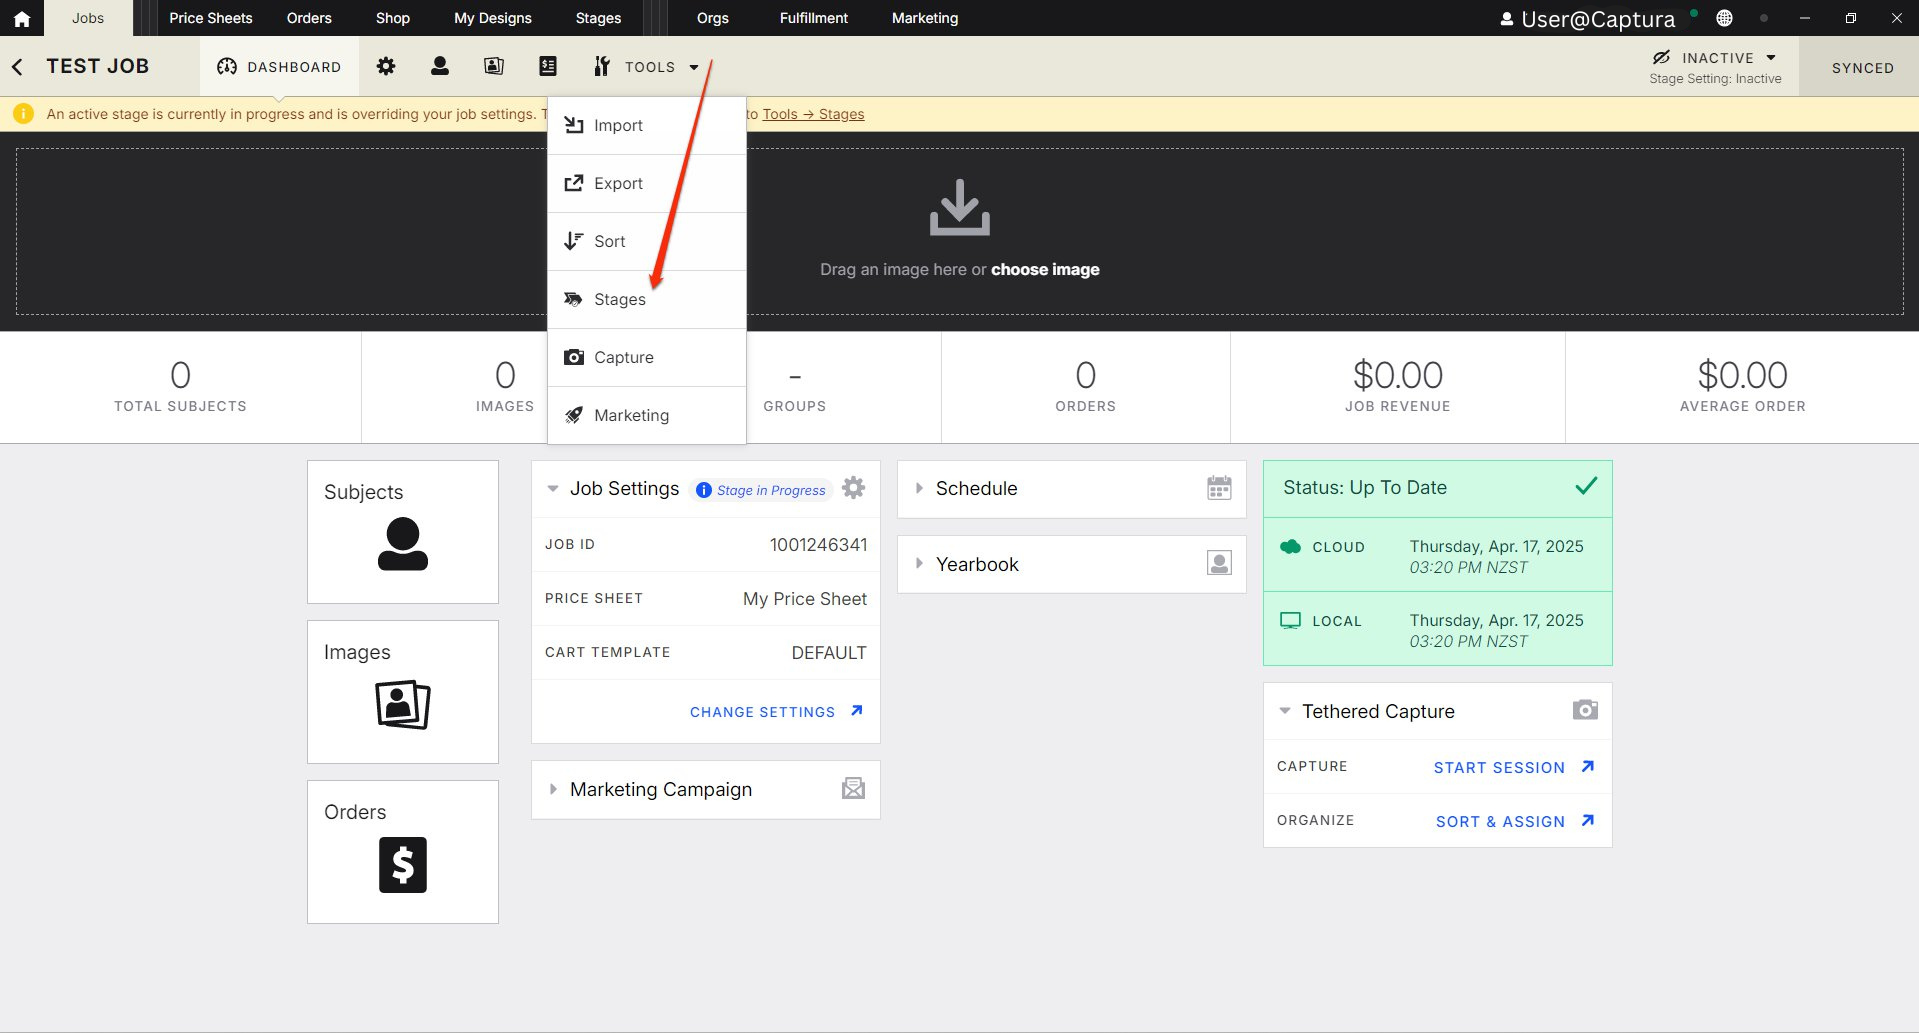
Click Tools.
Select Stages from the drop-down menu.
You can now view the stages assigned to the job and identify which stage is currently in progress.
3. Manually Starting the Next Stage
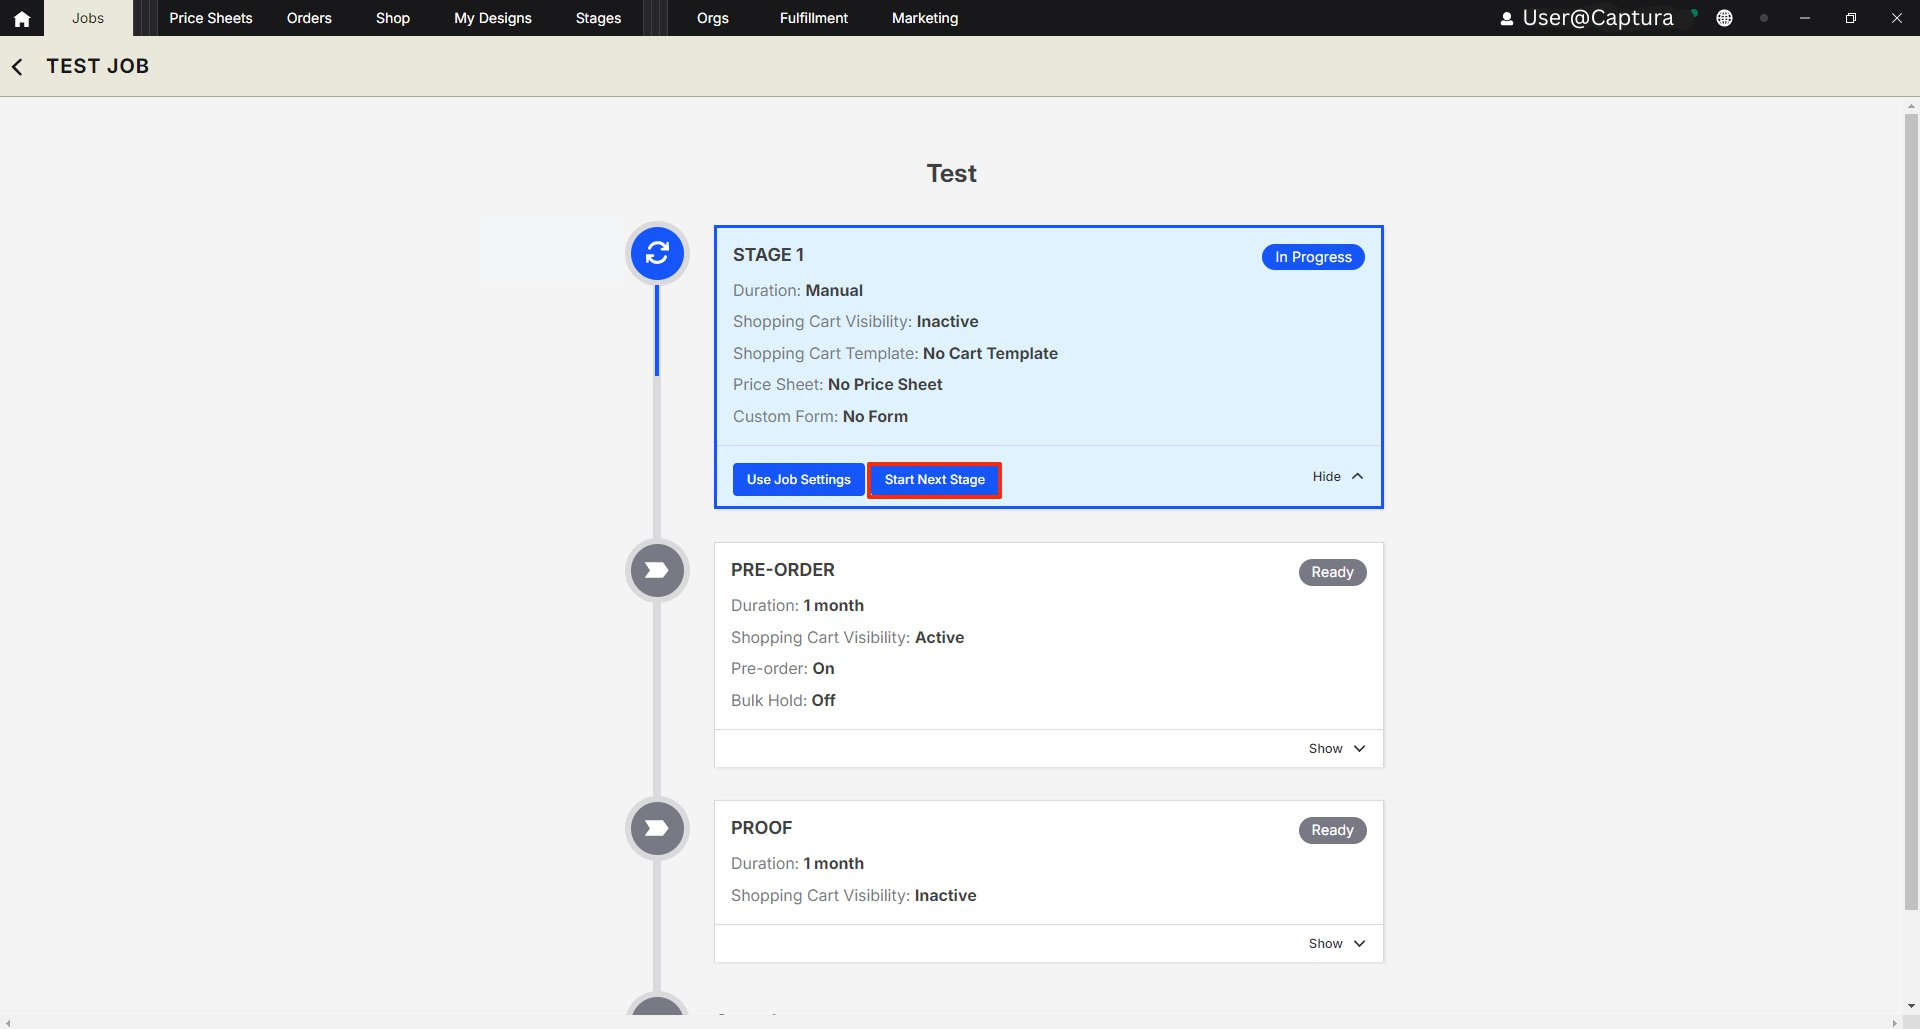
Stages configured with Manual duration do not automatically advance.
To move the job to the next stage:
Open the Job.
Navigate to Tools > Stages.
Locate the Stage In Progress.
Click Start Next Stage.
The job will move to the next stage in the sequence.
4. Temporarily Overriding Stage Automation
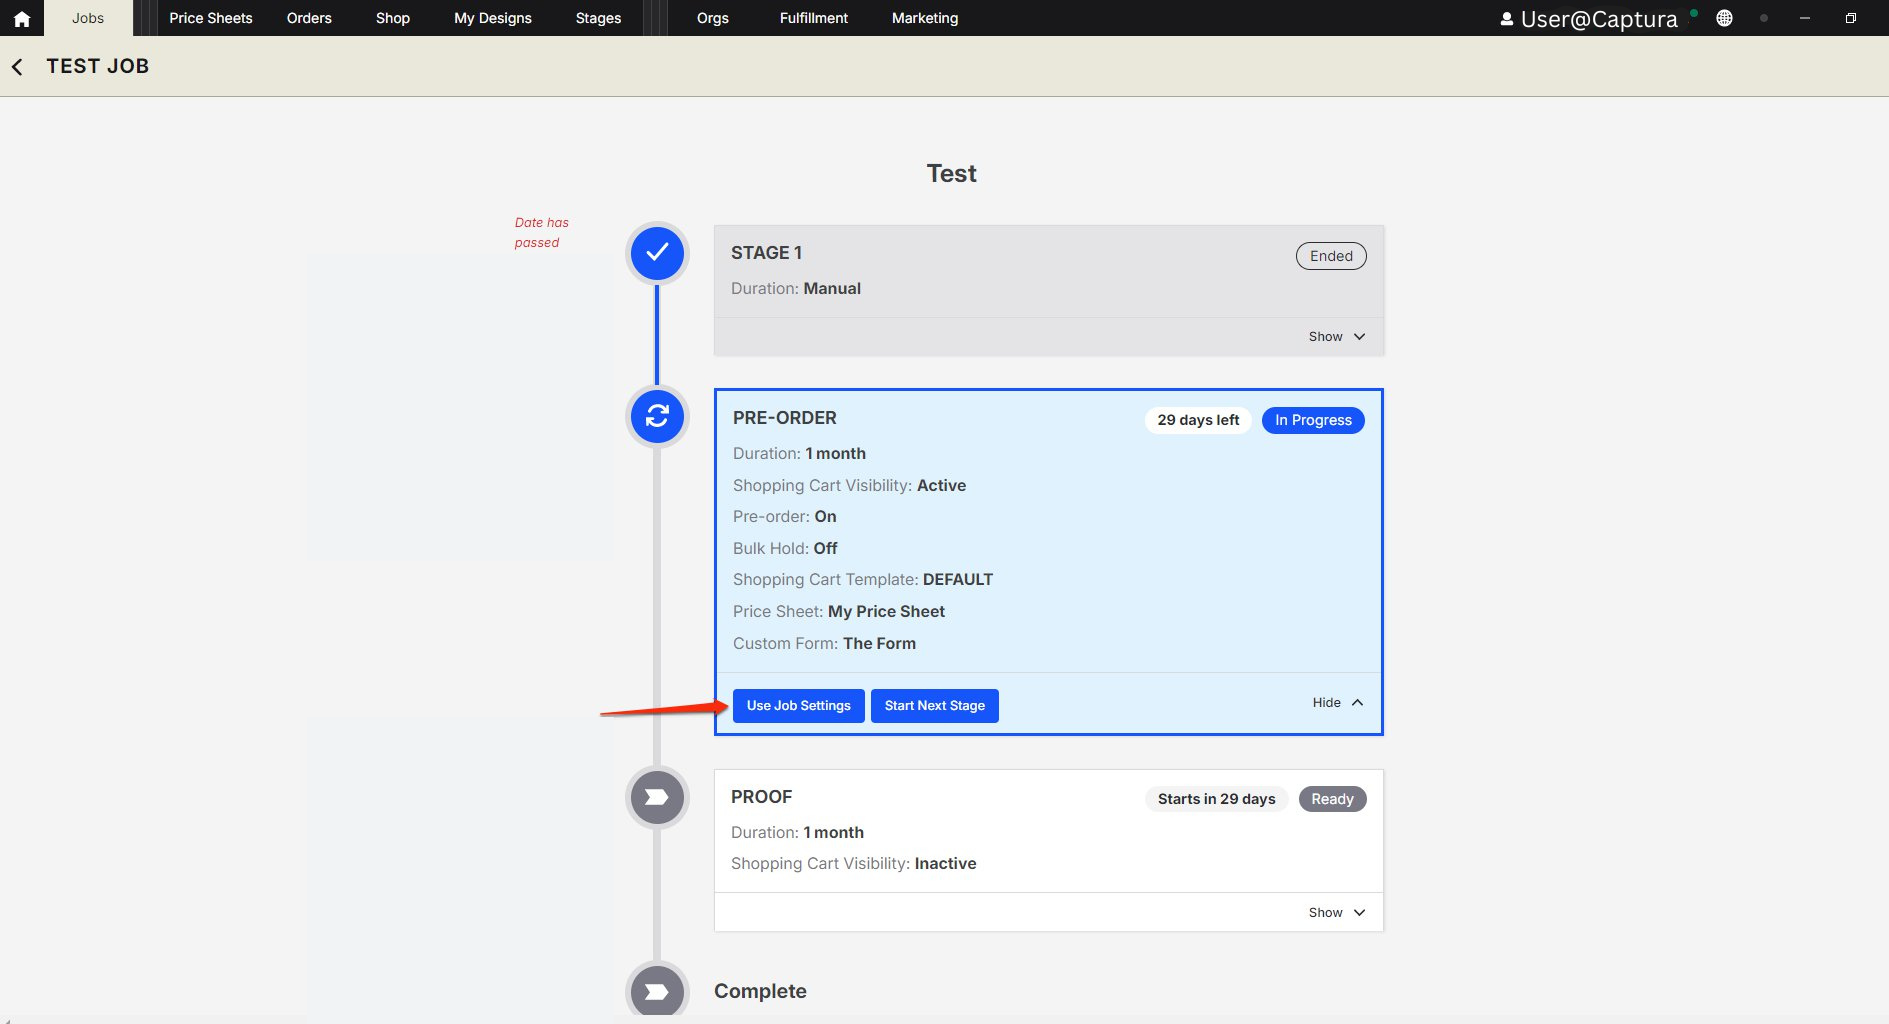
You can temporarily pause Stage Template automation and use the job's settings instead.
To override the active stage:
Open the Job.
Navigate to Tools > Stages.
Locate the active Stage.
Click Use Job Settings.
The job will now use its Job Settings instead of the active Stage Settings.
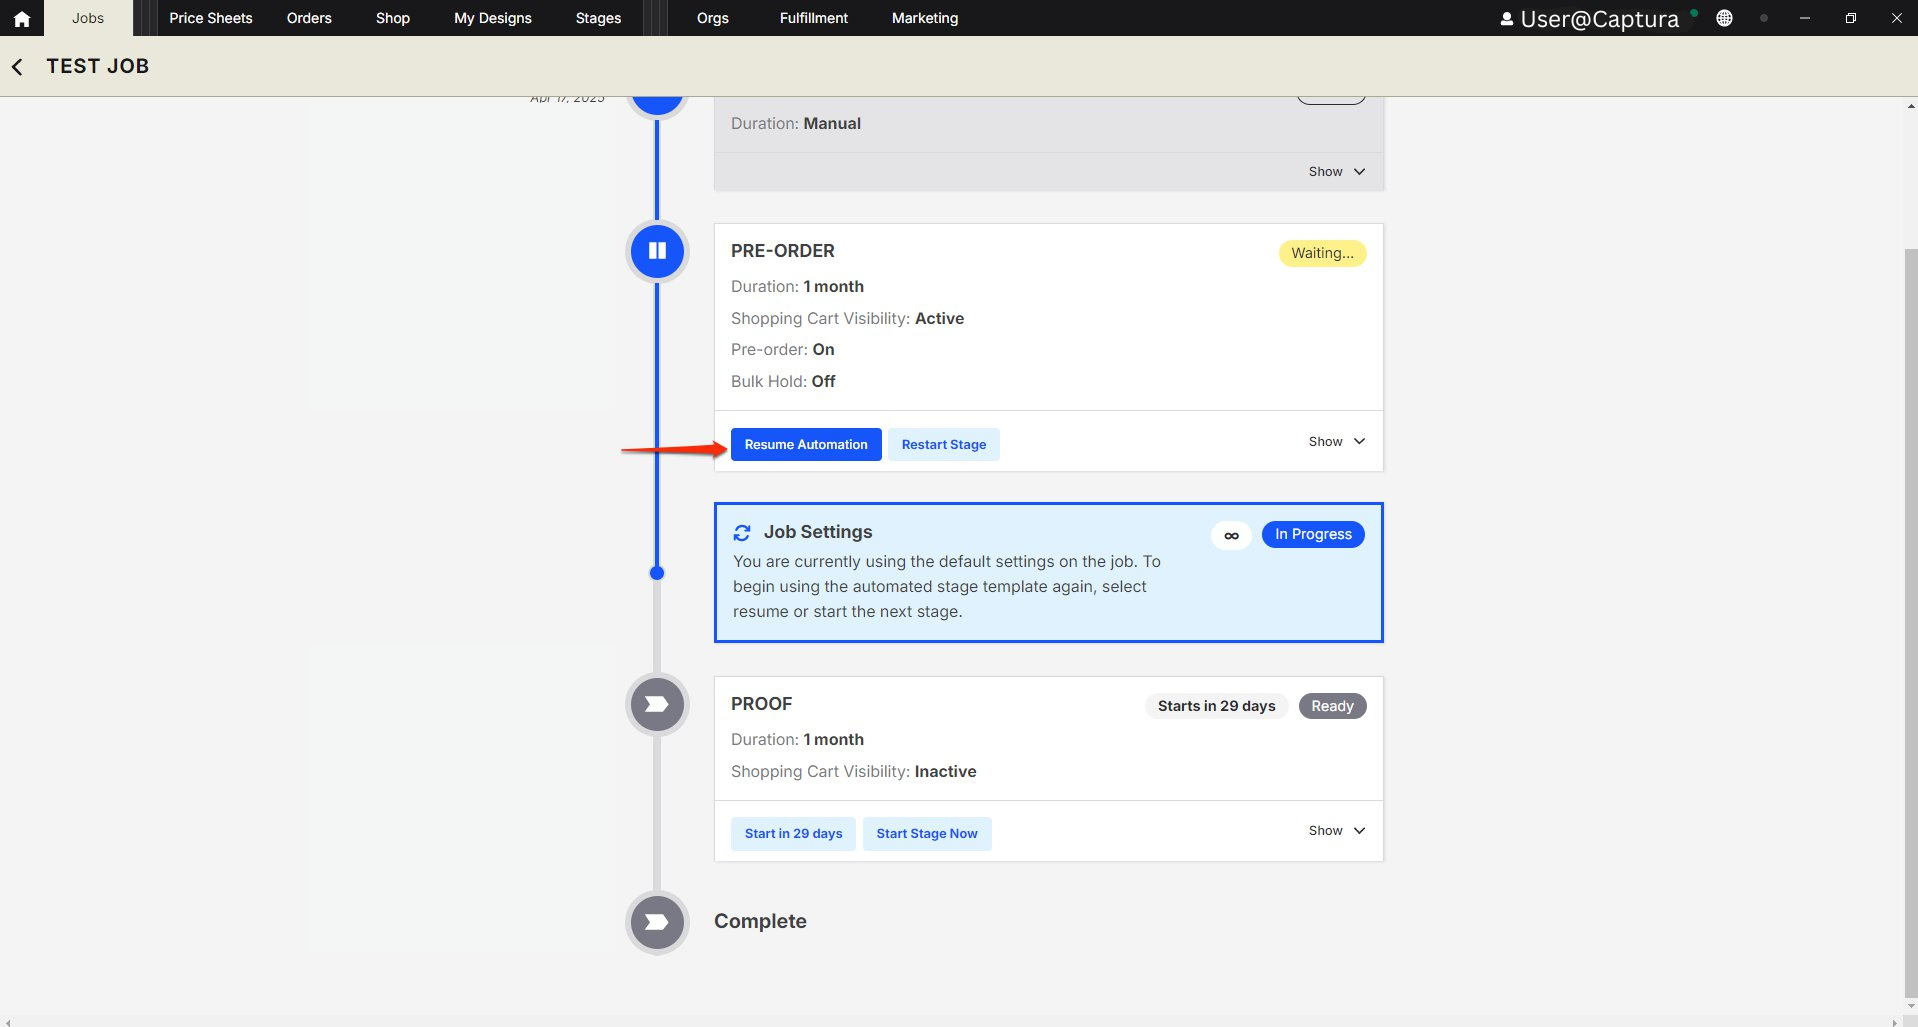
5. Resuming Stage Automation
When you are ready to return to the automated Stage Template settings:
Open the Job.
Navigate to Tools > Stages.
Click Resume Automation.
The job will switch from using Job Settings back to using Stage Settings.
6. Archiving a Stage Template
You can archive Stage Templates that are no longer needed.
Navigate to Stages.
Check the box next to the Stage Template or Templates you want to archive.
Click Archive.
Archived Stage Templates will be hidden from view in your account.
Important: Archiving a Stage Template does not automatically remove it from jobs where it has already been assigned.
7. Reactivating an Archived Stage Template
To restore an archived Stage Template:
Navigate to Stages.
Locate the archived Stage Template.
Check the box next to the template.
Click Activate.
The Stage Template will become active again.
Advanced Options/Additional Rules
Stage Scheduling and Automatic Progression
Stages follow the sequence defined by their Stage Position.
Timed stages run for the configured number of months, weeks, days, or hours.
Specific Date stages use a fixed end date.
Dynamic Job Date stages use dates configured within each job.
Manual stages require someone to select Start Next Stage.
If a Dynamic Job Date has already passed, that stage will be skipped and the next sequential stage with a future end date will be used.
Price Sheet Priority
If a stage has its own price sheet selected, that price sheet will be used during the stage.
If no price sheet is selected, the job's default price sheet will be used.
Common Questions
Q: Can I use the same Stage Template for multiple jobs?
A: Yes. Stage Templates can be reused across multiple jobs that follow the same workflow.
Q: What happens if a Dynamic Job Date has already passed?
A: The stage will be skipped, and the job will move to the next sequential stage with a future end date.
Q: What happens if I don't select a price sheet for a stage?
A: The job's default price sheet will be used.
Q: Can I manually move a job to the next stage?
A: Yes. For stages configured with Manual duration, open Tools > Stages and click Start Next Stage under the Stage In Progress.
Q: Can I temporarily stop Stage Template automation?
A: Yes. Click Use Job Settings under the active stage to pause the automation. Click Resume Automation when you want to return to the Stage Settings.
Q: What happens if I archive a Stage Template that's already assigned to a job?
A: Archiving hides the Stage Template from view in your account but does not remove it from jobs where it is already assigned.
Q: Which Direct Shipping Date takes priority when using Stages?
A: The Direct Shipping Date configured in the job's Main Settings takes priority and overrides Stage settings.
Q: Why can't someone in my studio sync a job after Stages have been added?
A: They may be using an incompatible Captura Workflow version. Jobs with Stages cannot be synced using the Fall Seasonal Release or versions older than 2024.2.7. Update to the latest release under Preferences > Advanced > Latest Releases.
Q: Are Stage Templates available to all Captura Workflow users?
A: No. Stage Templates are only available with Smart Workflow.