
How do I Reprint an order in Captura Workflow?
Brief Overview
When something goes wrong with an order—whether it arrives damaged, an item is missing, or something needs to be corrected—you need a quick way to make it right.
Quick Reprints in Captura Workflow let you resend a replacement order in just a few clicks without rebuilding the original order from scratch. That means less manual work for your team, a clearer process for the lab, and a faster resolution for your customer.
Overview & Objective
Quick Reprints are designed to make resolving order issues simpler while keeping the replacement connected to the original order.
With a Quick Reprint, you can:
Clone an existing order that has already been sent to the lab
Make relevant corrections, such as updating an image, crop, background, or shipping information
Send the replacement order with a $0.00 total
Select a required Reason for Reprint so the lab knows what needs to be corrected
Quick Reprints also make it easier to track what happened. The replacement is created as a new order and linked back to the original, giving your team a clearer history without adding unnecessary manual steps.
Setup / Configuration
Before creating a Quick Reprint, confirm that:
The original order has already been sent to the lab.
The user creating the reprint has Refund Management (Add/Edit) permissions.
You know which order needs to be replaced and why.
You can start a Quick Reprint from several places in Workflow:
Location | Where to Start |
|---|---|
Account Level | Open the Orders tab. |
Job Level | Open the Job, then select the Orders tab. |
Subject Level | Open the Subject, then select the Orders tab. |
💡 PRO TIP: Before starting the reprint, confirm exactly what needs to be corrected. Keeping changes limited to the original issue helps reduce errors and gets the replacement back to the lab faster.
Step-by-Step Instructions
1. Find the original order
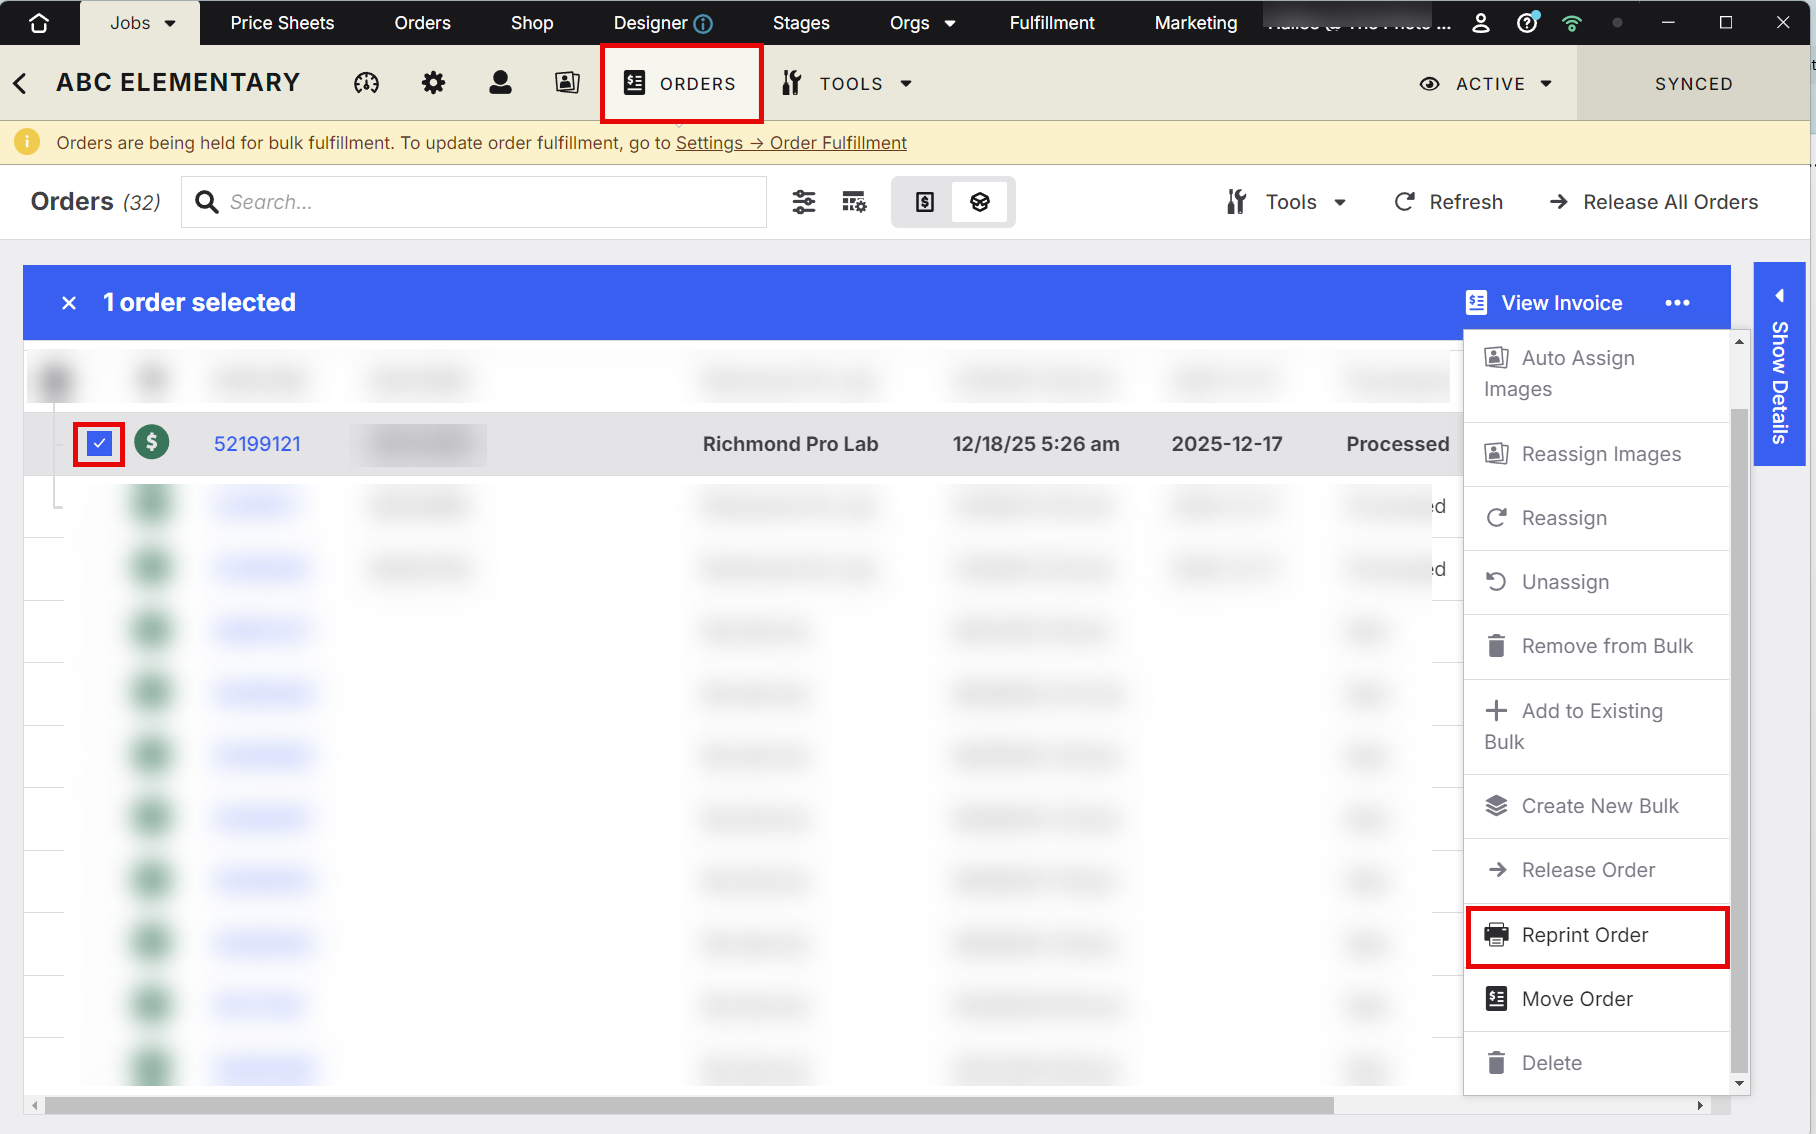
Navigate to the appropriate Orders tab at the Account, Job, or Subject level.
Find and select the order that needs to be reprinted.
2. Select Reprint Order
With the order selected, open the menu and click Reprint Order.
Workflow will create the reprint using information from the original order, so you don’t have to rebuild it from scratch.
3. Review the order details
Review the pre-filled information from the original order.
Make sure you’re working with the correct customer, products, and order before continuing.
4. Select a Reason for Reprint
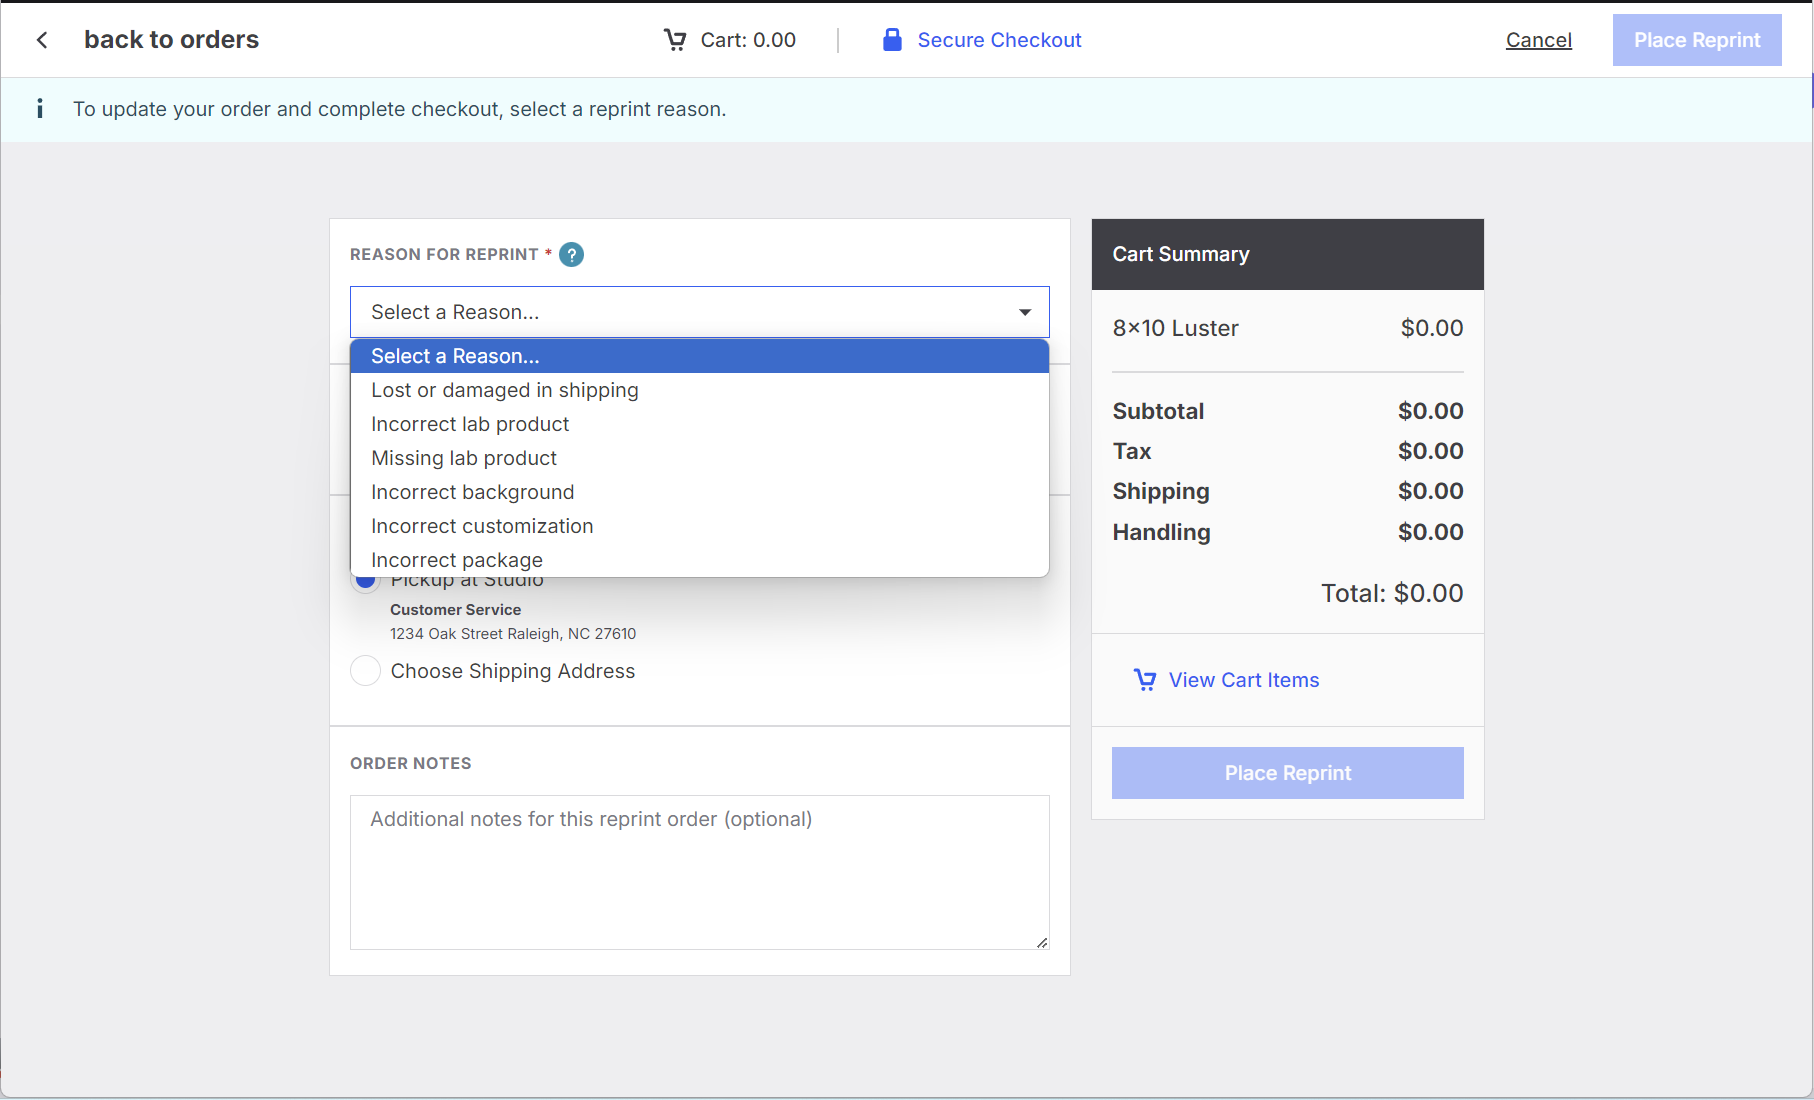
Choose the appropriate Reason for Reprint.
This field is required.
The reason gives the lab clear, structured information about why the replacement is being sent and can determine which parts of the order you’re able to change.
5. Make any necessary changes
Depending on the reprint reason, you can make relevant corrections to the replacement order.
You may be able to:
Change the shipping method or address
Update the image, crop, or background
Remove items
Reduce quantities
Adjust selections related to the issue
Quick Reprints are intended to correct an existing order, so you cannot:
Add new products
Increase quantities
Reprint multiple orders at once
6. Review the cart
Review the replacement order carefully before submitting it.
The reprint order total will display as $0.00.
Double-check that the products, quantities, images, customization, and shipping details reflect the correction you need.
7. Choose whether to send a confirmation email
If appropriate, you can send a confirmation email to the customer.
This is optional and can be useful when the customer is expecting an update about their replacement.
8. Place the reprint
When everything looks correct, click Place Reprint.
The replacement order will be sent to the lab with the selected reprint reason.
Advanced Options/Additional Rules
What You Can and Can’t Change
Quick Reprints give you flexibility where it matters while keeping the replacement tied to what was originally purchased.
You Can | You Can’t |
|---|---|
Change the shipping method or address | Add new products |
Update the image, crop, or background | Increase quantities |
Remove items | Reprint multiple orders at once |
Reduce quantities | |
Adjust selections based on the issue |
How Reprint Reasons Affect Your Options
The Reason for Reprint helps determine what changes can be made to the replacement order.
Lost or Damaged in Shipping
Resend the original order as it was, with the option to update the shipping address to help make sure the replacement reaches the right destination.
Incorrect Product — Lab Issue
Select the specific product or products from the original order that need to be resent. You don’t need to resend the entire order when only part of it needs to be corrected.
Missing Product
Choose the item or items that were missing from the original order so they can be resent to the customer.
Incorrect Background
Update the background or relevant design details to match what the customer expected.
Incorrect Customization
Correct personalization details, such as text or layout, before sending the replacement.
Incorrect Package
Adjust the relevant design or product details so the replacement reflects the correct package selection.
Selecting the right reason helps keep the reprint focused on the original issue and gives the lab clearer information for fulfillment.
What Happens After You Place a Reprint?
Once you place the reprint:
A new order is created with a $0.00 total.
The new order is identified as a reprint of the original order.
The selected Reason for Reprint is included for the lab.
The lab receives the structured information needed to process the replacement.
This gives your studio a clear record of the correction while keeping the original order intact.
Tracking Reprints in Workflow
You can continue tracking reprints directly in Workflow.
Reprint orders are labeled “Reprint of [Original Order ID]”.
Orders can be filtered by Reprint.
Reprints can be included or excluded from exports.
Permissions
Only users with Refund Management (Add/Edit) permissions can create Quick Reprints.
If you don’t see the reprint option, check your user permissions.
Common Questions
Q: When should I use a Quick Reprint?
A: Use a Quick Reprint when an existing order needs to be replaced because of lost or damaged items, missing products, an incorrect image, crop or background, customization errors, or lab and production issues.
Q: Does a Quick Reprint create a new order?
A: Yes. Workflow creates a new $0.00 order and identifies it as a reprint of the original order.
Q: Can I add another product to a reprint?
A: No. Quick Reprints are designed to correct an existing order, so new products cannot be added.
Q: Can I increase the quantity of a product?
A: No. You can reduce quantities or remove items when appropriate, but you cannot increase the original quantities.
Q: Can I change the customer's shipping address?
A: Yes. Shipping details can be updated when appropriate for the reprint.
Q: Why do I have to select a Reason for Reprint?
A: The reason tells the lab why the order is being replaced and helps determine which changes can be made to the reprint.
Q: Can I reprint several orders at the same time?
A: No. Quick Reprints are created one order at a time.
Q: Can I notify the customer about their replacement?
A: Yes. You have the option to send a confirmation email to the customer when creating the reprint.
Q: Where can I find a reprint after it has been placed?
A: Reprints can be tracked in Workflow and are labeled “Reprint of [Original Order ID]”. You can also filter orders by Reprint and choose whether to include or exclude them from exports.
Q: Why don’t I see the option to create a reprint?
A: Confirm that the original order has been sent to the lab and that your user account has Refund Management (Add/Edit) permissions.