
Creating a New Job
Your Job Is the Command Center
In Captura Workflow, every project starts with a Job — the central workspace that keeps your images, data, and orders connected. Follow these steps to create one confidently.
🧩 Pro Tip: Once you are familiar with Job Creation, Start building Job Templates. Example: TEMPLATE_Underclass_Preorder_marketing so you can simply Duplicate a “Job Template” and tweak the Name, Org, Etc. This will save a ton of time when you have a lot of Schools!
Step-by-Step: Creating a New Job
1️⃣ Go to Jobs → + New
From your Jobs dashboard and click + New to create a job.

+ New Job
2️⃣ Name Job Clearly
Use a naming format your team will recognize at a glance. Example: ABC Elementary School Fall Picture Day 2026.
🧩 Pro Tip: Stick to this format across every event for consistency and easy reporting.
3️⃣ Select the Job Type
Pick the correct category (Underclass Fall, Seniors, Sports, etc.). Your job type drives filters, reports, etc.
4️⃣ Configure Core Settings
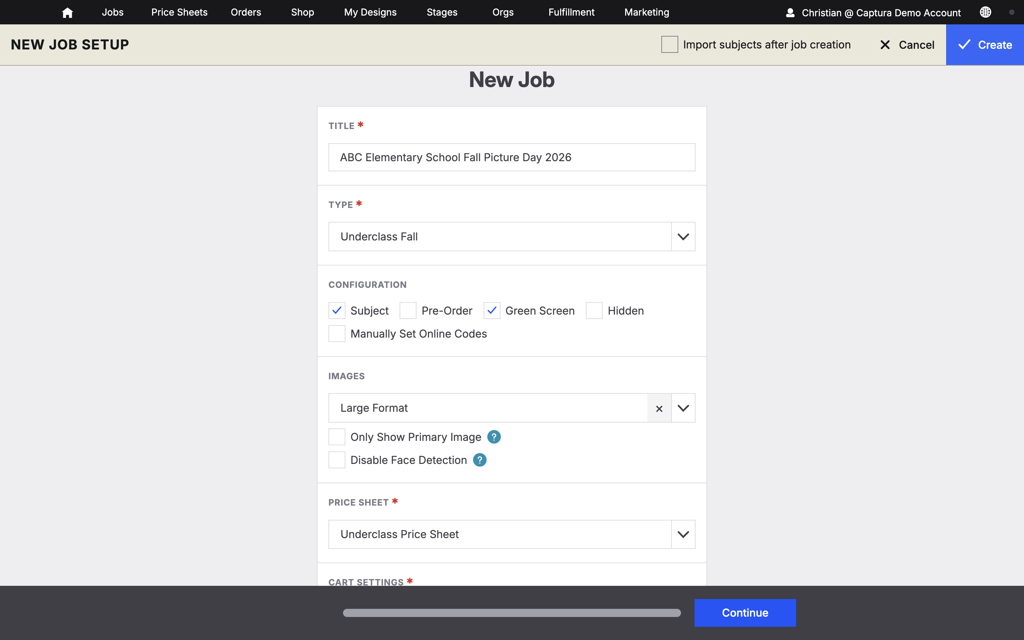
New Job - Core Settings
This is an important step — some settings locked after creation. Check these carefully before saving:
Setting | Enabled ✅ | Disabled ⬜ | Why It Matters |
Subject | "Creates private, subject-based galleries (recommended for tethered capture)" | Public gallery where all images are visible | Keeps every subject’s images private and organized automatically |
Pre-Order | Customers can Order without Photos or Subject Data | Requires a Subject and Photo in Gallery to Order | During the pre-order phase, customers cannot choose their specific images |
Green Screen | Supports PNGs and background changes | Converts all PNGs to JPGs | Enables advanced product options and composite backgrounds |
Image Format | Large (up to 6000px) | Standard (up to 3200px) | Ensures quality viewing on all devices |
Face Detection | On for automatic head-sizing | Off for faster imports | Helps maintain consistent framing and saves editing time later |
5️⃣ Assign the Price Sheet & Cart
Select your prebuilt Price Sheet and Shopping Cart Template for the job.
⚠️ Important : If you’re using Stages, the Stage Template may automatically override these settings based on the current phase—so everything stays aligned without extra work.
6️⃣ Choose the Organization for the Job (Optional)
In Captura Workflow, an Organization is the client tied to your job, like a school or sports league. Adding an Organization connects the job to the correct client data, improves reporting accuracy, and helps streamline design and production workflows.
7️⃣ Click Continue to fill out the rest of the Jobs' Details (Optional)
Option | Purpose | Why It Matters |
Event Date & Retake Date | These fields capture the actual date of the photo day and any retake session. | These dates drive automation. When using Stages, you can select Dynamic Job Date to automatically trigger stage changes—like price increases, cart visibility, or shipping rules—a set number of days before or after the event or retake. |
Expiration Date | The deadline for customers to place online orders. | Expiration dates create urgency and protect your production timeline. Once the gallery expires, customers see the Gallery Expired Message from the Shopping Cart Template and can’t place new orders unless the job is reactivated. |
Custom Date(s) | Custom Date 1 and Custom Date 2 are flexible scheduling fields. | These dates are most commonly used for Marketing Campaigns. They allow emails or SMS messages to send relative to a custom milestone—such as “2 days after Custom Date 1.” |
Custom Marketing (1-5) | Five text fields (up to 255 characters each) for job-specific messaging. | These fields let you reuse a single global marketing campaign while inserting job-specific details—like school instructions, pickup notes, or special reminders—without creating new campaigns for every job. |
Job Images | Up to 7 Images can be added here for use in Mydesigns | These images should be School/Sport Logos to help in automating Prints using Mydesigns instead of creating a template for each Job/design. |
Direct Shipping Date | The date when a job switches from bulk (studio) shipping to direct-to-home shipping. | This date acts as an automatic override. Even if bulk shipping is enabled, any order placed after this date will ship directly to the customer. |
Hold Order fulfillment | To Hold Orders for Manual Release. |
|
You can always complete these details later.
- OR -
6️⃣ Click Create
Before finalizing, take one last pass through the details—especially Subject and Green Screen settings. These can’t be changed later.
🧩 Pro Tip: If you enable the “Import subjects after job creation” option, you’ll be launched into the Import process, saving you steps.
7️⃣ Automate the Job Lifecycle with Stages (Optional)
Instead of manually managing a job from start to finish, assign a Stage Template. Stages help automate each phase of the job—so things run smoothly without constant oversight. Why it matters:
Stages reduce manual work and keep pricing, forms, and availability aligned with where the job is in the season—helping you make more time and avoid costly mistakes. If you’re using a Job Template this option is included.
How to assign a Stage Template:
Open Job. Go to Job Settings → General
Scroll to Add Stage Template
Select the template you want to use
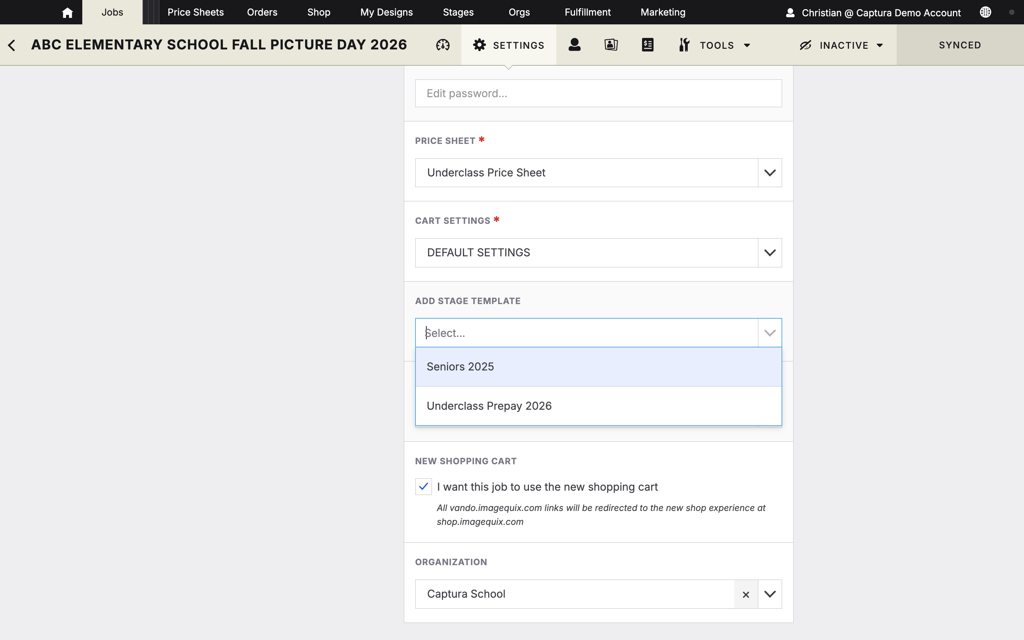
Add Stage Template
What stages control:
How long each phase lasts
Which price sheet is active
Required custom forms
Whether the cart is visible or hidden
🧩 Pro Tip: If you’re not using the Latest Releases version of Workflow, adding stages may prevent syncing.
8️⃣ Set Up Bulk Shipping (Order Holding)
If you plan to batch orders for studio delivery—or need time for Quality Assurance before release—set up Order Holding. Why it matters: This gives you control over when orders go to the lab, making bulk fulfillment and QA easier during busy seasons. If you’re using a Job Template this option is included.
How to enable Order Holding:
Open Job. Go to Job Settings → Order Fulfillment
Check Hold Orders for Manual Release
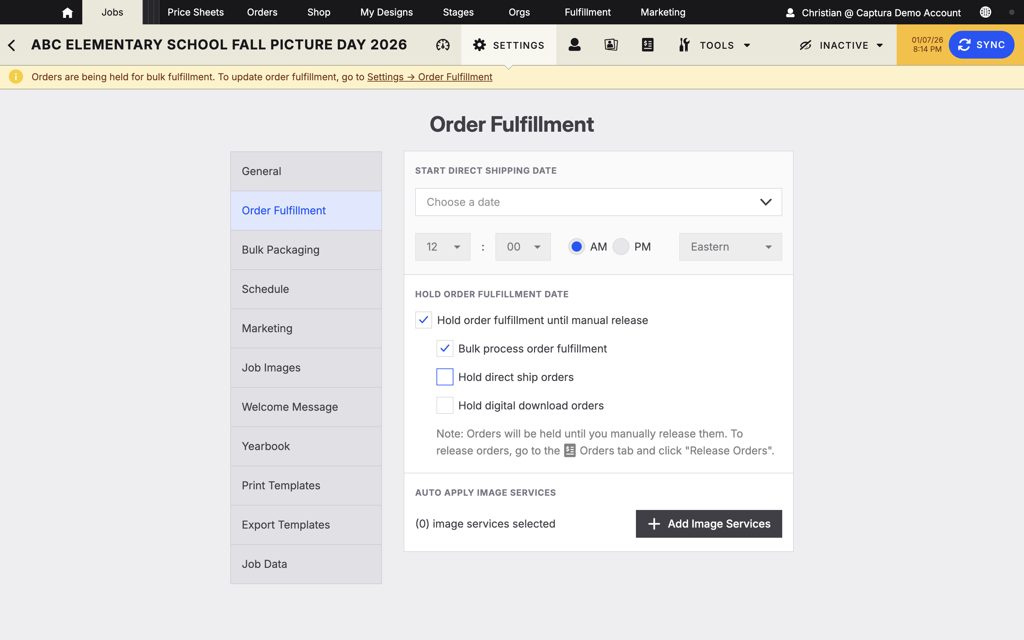
Hold Orders - Fulfillment
This stops orders from going directly to the lab, so you can release them when you’re ready.
Cart setup matters: Make sure the Shopping Cart Template assigned to the job is set to:
Pick-Up Only (for bulk studio shipments), or
Customer Choice
⚠️ Important: If a Start Direct Ship Date is set in the schedule, it will override Order Holding and automatically release orders after that date.
Focus on impact:
A quick review here saves time, rework, and headaches later.After Job Creation
💡 Why This Matters
Consistent setup saves hours of troubleshooting later
Locked settings (like Subject and Green Screen) protect gallery accuracy
Correct job configuration ensures every downstream process — capture, order, yearbook export — runs flawlessly