
Subject Data Import and Management
Connecting the Right Data to Every Image
Accurate subject data is the backbone of every successful tethered session. In Captura Workflow, subject information links each image to the right person — powering private galleries, yearbook exports, and order fulfillment.
Importing Subject Data
Start with a Clean, Structured File
You can’t have a smooth shoot without solid data. Before importing, make sure your spreadsheet or CSV file is clean and correctly formatted. We recommend .csv files.
✅ Tip: Keep headers simple and clear — e.g., First Name, Last Name, Grade. In Captura Workflow, “Subject ID” is used for Student ID from the school.
Step-by-Step: Import Subject Data
1️⃣ Open Your Job and Go to Tools → Import
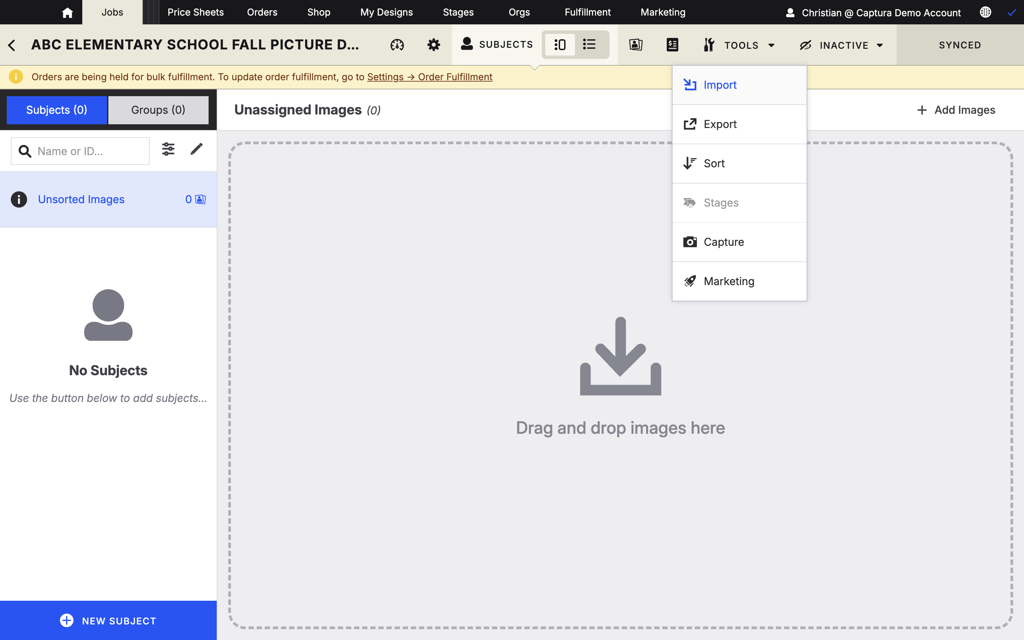
Tools → Import
Select the “Subject Data & Images” option.
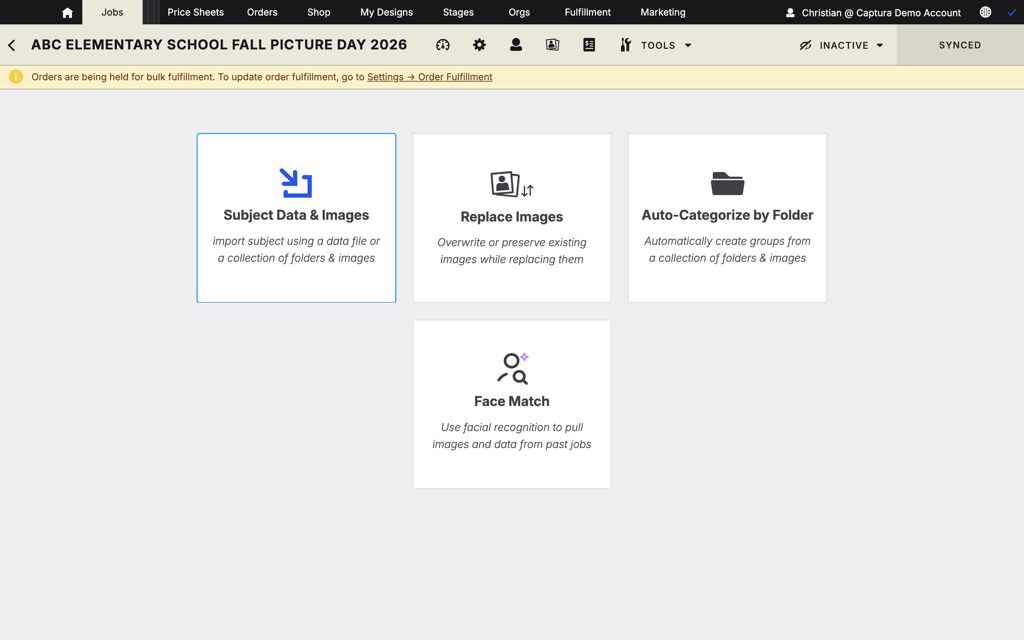
Subject Data & Images
2️⃣ Choose “Data File” as the Import Type
This tells Captura you’re uploading subject data (not images or orders).
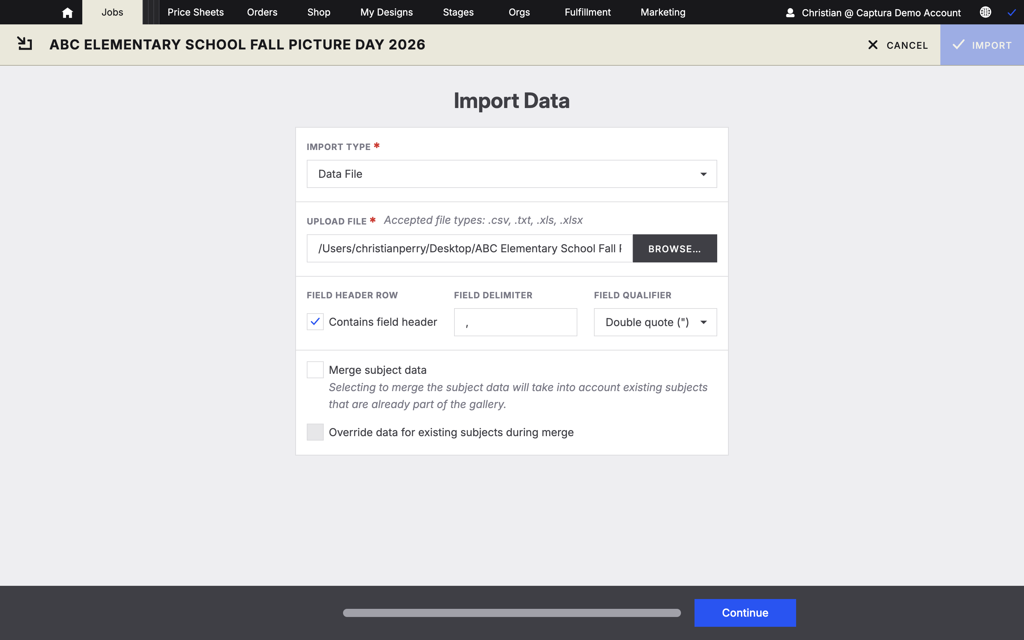
Choose Data File
3️⃣ Select Your File
Click Browse… and upload your structured file (.csv, .txt, or .xlsx).
Setting | Why It Matters | ||
Field Header Row | Enabled ✅ The data file includes the first row that defines the subject field names | Disabled ⬜ The fields will not be automatically mapped | A file header is Important to automatically map the fields on import - saving time |
Field Delimiter | What is being used to separate the fields in the data file? , tab | are options | Default is a Comma , | Required to make sure the fields are separated correctly |
Field Qualifier | Is there a qualifier for the fields? This is used to allow characters such as commas in a field | Default is None | If a data file is comma-separated (CSV), but one of the fields, such as an address or description, contains a comma |
Merge Subject Data | Disabled ⬜ Used only when updating existing records | Enabled ✅ Merges imported data into existing subject records | Only use this option if you’re updating existing data records - requires a Unique field to match on |
Override Data | Disabled ⬜ Only available when Merge is enabled | Enabled ✅ Will Override instead of merge new data into existing subjects | Useful if you need to replace existing data - Try using the Subjects Replace Data feature instead |
4️⃣ Match Columns to System Fields
Captura auto-maps common headers, but always double-check. Use the dropdowns to fix any mismatches or assign new columns. Unmapped fields are ignored during import.
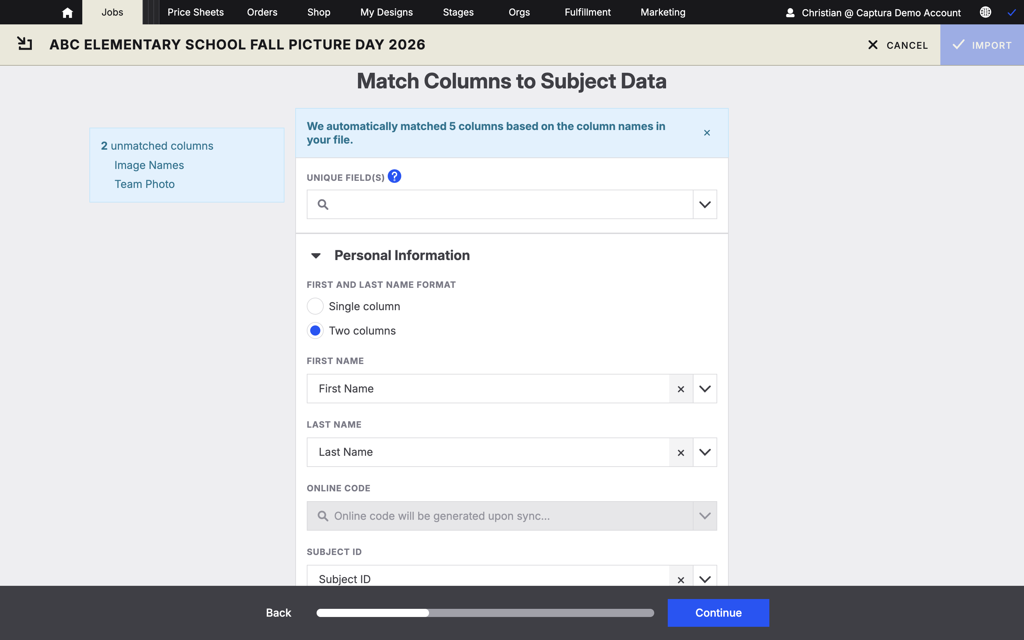
Field Mapping
Captura Workflow Most Commonly Used Field Names - Cheatsheet
Subject Field | Captura Workflow Mapping | Subject Field | Captura Workflow Mapping |
|---|---|---|---|
First Name | First Name | Address | Address Line 1 |
Last Name | Last Name | City | City |
Student ID | Subject ID | State | State |
Grade | Grade | Zip | Zip/Postal Code |
Teacher | Teacher | Country | Country |
Home Room | Homeroom | Phone Number | Phone 1 |
Online Code * Only needed when Manually Creating codes | Online Code | Email Address | Email(s) |
5️⃣ Skip Image Associations (for Live Capture)
If you’re shooting tethered, or are simply importing a school roster, image filenames will sync automatically during capture — no need to import and match them here.
6️⃣ Review the Summary, Then Import
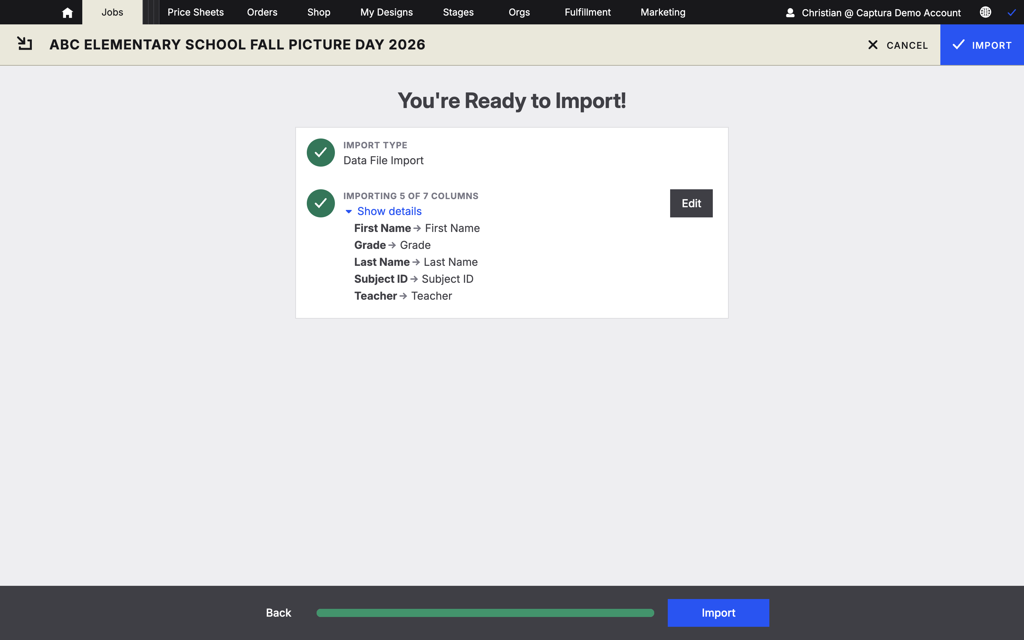
Import Summary
Before finalizing, review the summary screen carefully using the Show Details dropdown. Confirm field mappings, record counts, and any skipped data.
💡 Why This Matters
Correct mappings = instant, automatic subject linking during capture.
Clean data prevents duplicate records and gallery errors.
Getting this step right saves hours of manual reassigning later.
Refining and Cleaning Subject Data
Keep Your Data Professional, Consistent, and Ready for Exports
Even the best source files from schools or leagues usually need some cleanup. Captura Workflow gives you flexible tools to tidy, reformat, and standardize data quickly.
1️⃣ Bulk Reformat Fields
Open Job → Settings → Job Data → Subject Data Field Formatting.
Choose a field (like First Name or Homeroom) and apply consistent text formatting across all records:
Format Option | Example | Use When |
Proper Case | “Jane Doe” | Standard name formatting |
lowercase | “jane doe” | Email addresses or IDs |
CAPITAL CASE | “JANE DOE” | Export lists or certificates |
Name Case | "“O’Malley”, “Leigh-Williams”" | Preserves complex names |
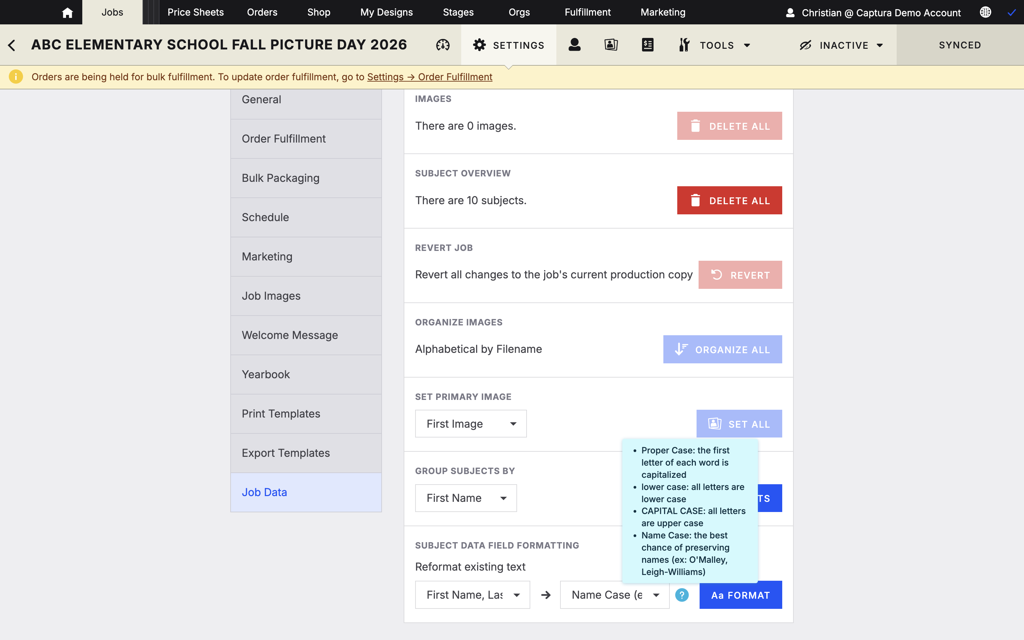
Data Formatting
✅ Tip: Always reformat before printing subject camera cards or generating exports.
2️⃣ Use Sheet View for Quick Edits
From the Subjects tab, open Sheet View — a spreadsheet-style editor for inline updates.

Subjects View
Click directly into any data cell to fix typos or update missing info on the fly.
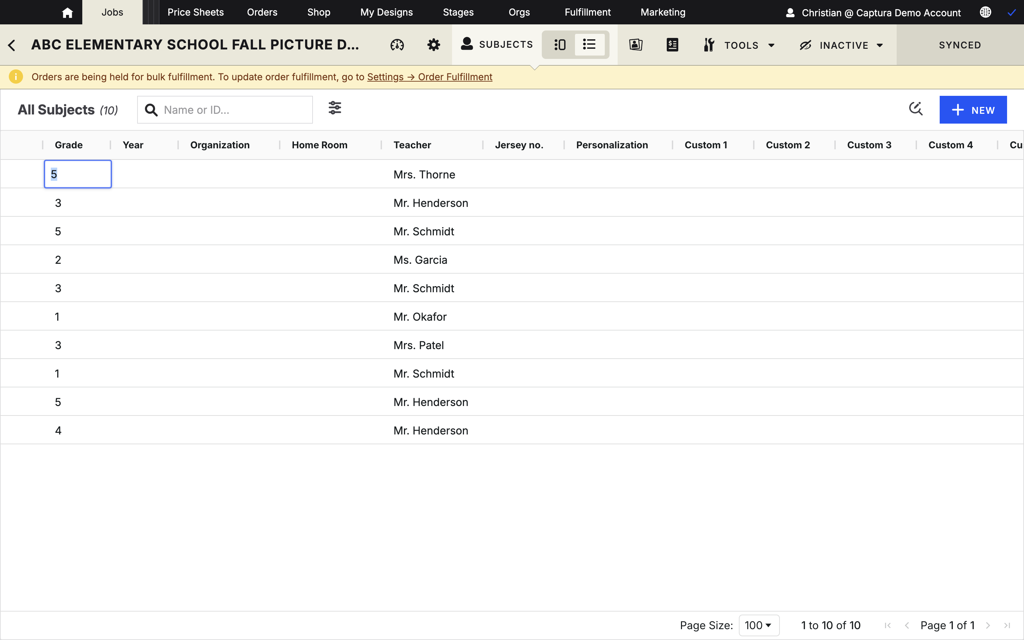
Quick Edits
Click directly into any data cell to fix typos or update missing info on the fly.
🧩 Pro Tip: You can sort and filter columns to find inconsistencies faster (e.g., missing grades or duplicate names).
3️⃣ Find & Replace Across All Records
Use the Find & Replace tool (also in Sheet View) to correct or standardize entries. Examples:
Fix misspellings (“Jhon” → “John”)
Normalize data (“9th Grade” → “9”)
Advance Grades (“9” → “10”)
Replace Teacher or homeroom names in bulk
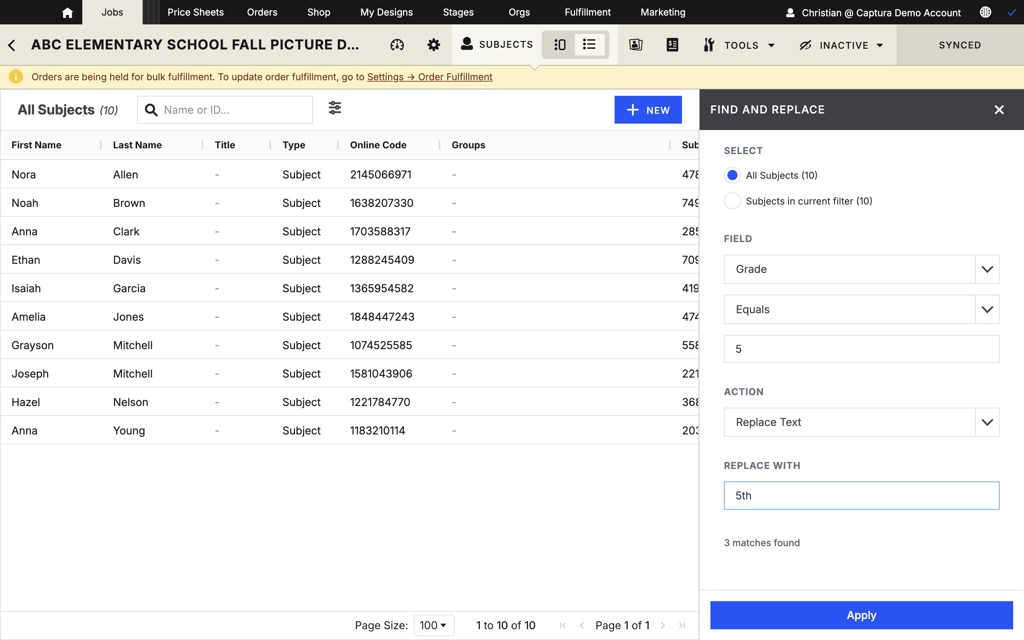
Advanced Replace
💡 Why This Matters
Clean data = cleaner galleries and smoother fulfillment.
Accurate names and codes prevent ID mismatches during capture.
Standardized formatting helps with exports to Yearbooks, Portals, and lab systems.
🟢 Quick Recap: Data Import Essentials
Import clean, structured files
Review and map fields carefully
Reformat and correct in Sheet View
Keep naming consistent for all jobs
A little time spent here saves a lot of time later — and gives your photographers confidence that every shot will connect to the right subject automatically.