
Merging Subject Data + Images
Brief Overview
Need to add new information to a Job without creating duplicate subjects—or update information that’s already there?
Captura Workflow gives you Merge and Override options when importing Subject Data. Understanding when to use each option helps keep your subject records accurate and saves your team from cleaning up duplicate or outdated information later.
Overview & Objective
When importing Subject Data into a Job that already contains subjects, Workflow needs to know how you want the new data handled.
You have two important options:
Merge subject data — Use this when there is already Subject Data in the Job you're importing into.
Override data for existing subjects during merge — Use this when there is already Subject Data in the Job and you want to update existing information with data from your import file.
Workflow also uses a Unique Field to compare your import file against existing Subject Data. This helps Workflow determine whether a subject already exists before creating a new record.
Getting these settings right helps you update the information you need while avoiding duplicate subjects.
Setup / Configuration
Before You Begin
If you're new to importing subjects, start with our Importing Subject Data + Images article to learn the basics of importing Subject Data and images into Workflow.
This article focuses specifically on using Merge, Override, and Unique Fields when you're importing data into a Job that already contains Subject Data.
Where to Get Started
Open the Job you want to update, then go to:
Tools > Import > Subject Data & Images
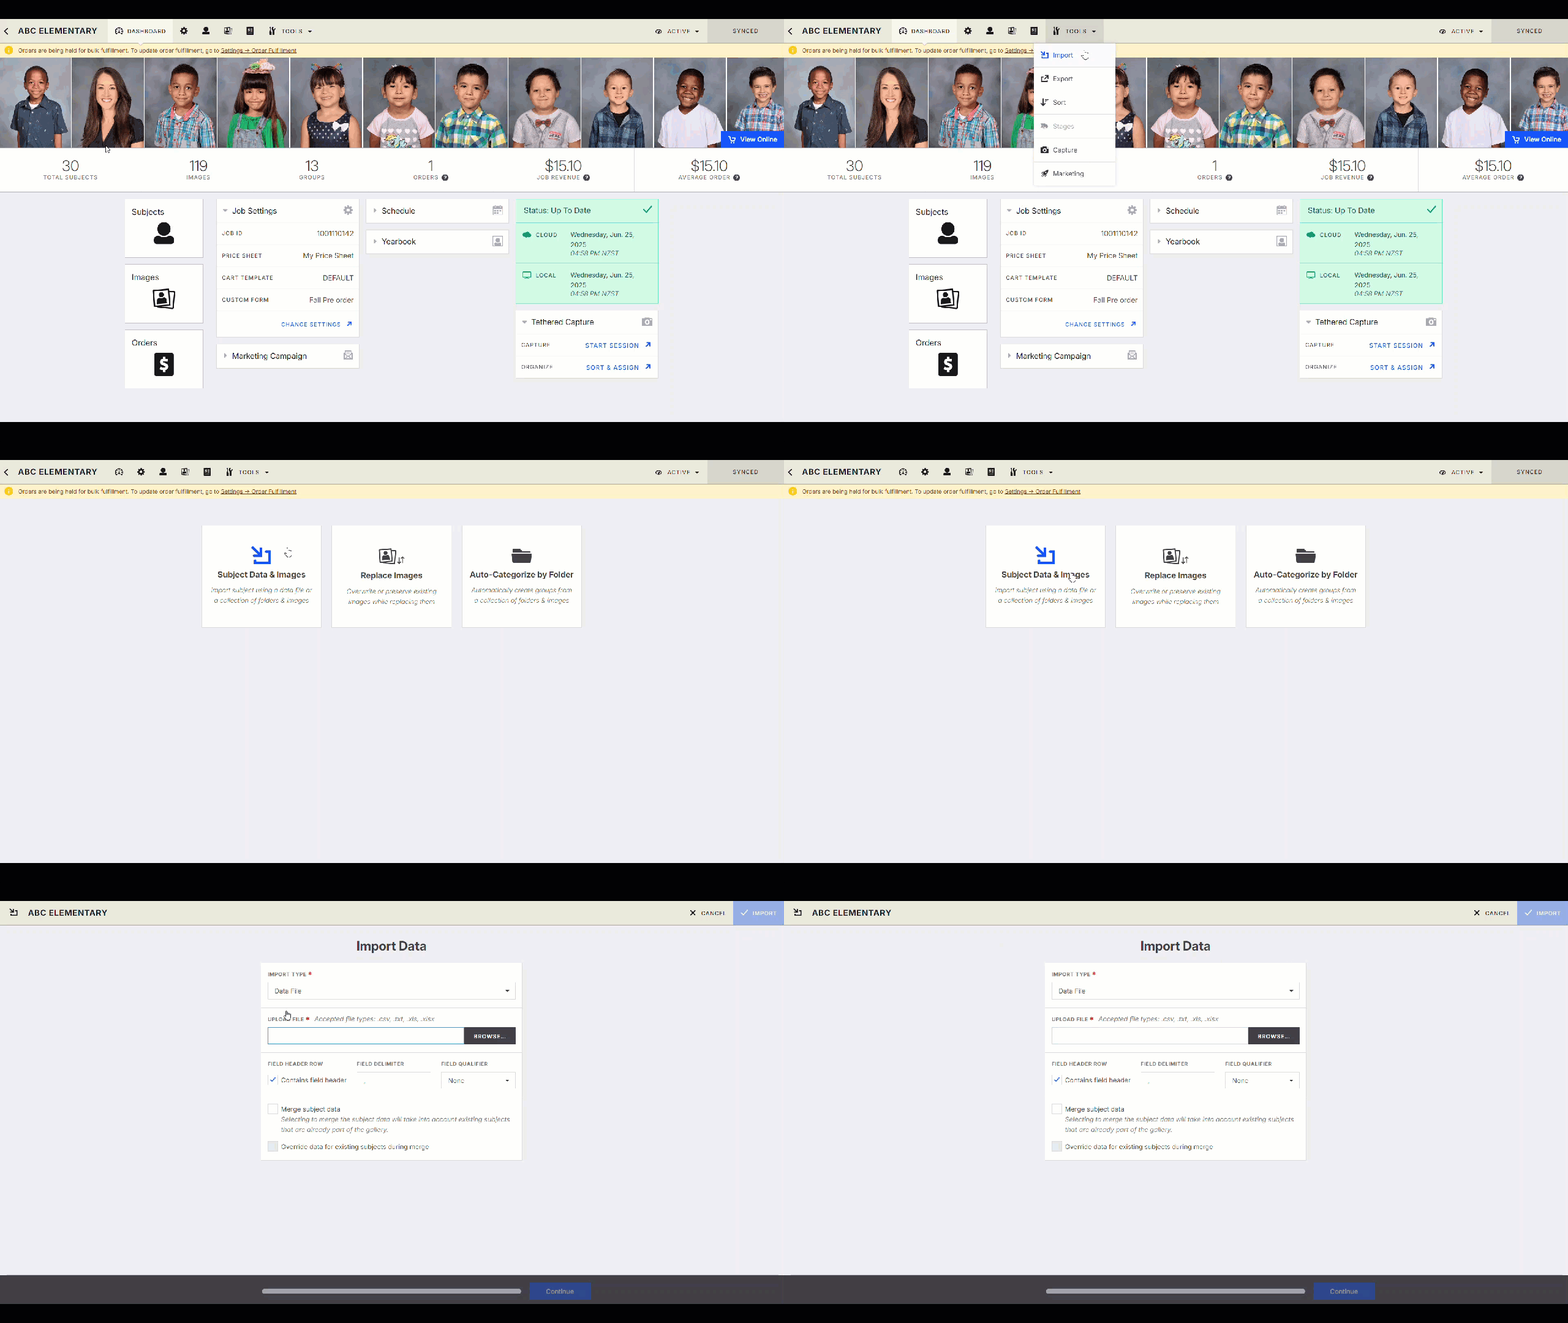
After you've selected your Import Type and Upload File Configuration, you'll see the options for merging and overriding Subject Data.
Merge vs. Override
Use this table as a quick guide:
Option | When to Use It | What It Does |
|---|---|---|
Merge subject data | There is already Subject Data in the Job you're importing into. | Allows the imported data to be matched with existing subjects instead of simply creating new subject records. |
Override data for existing subjects during merge | There is already Subject Data in the Job and you want to update existing information using the import file. | Updates mapped fields for existing subjects when Workflow finds an exact match using the selected Unique Field. |
💡 PRO TIP: Most studios use either the subject’s Online Code or Student ID as the Unique Field because these are typically unique to each subject.
Step-by-Step Instructions
1. Open the Import Tool
From inside your Job, go to:
Tools > Import > Subject Data & Images
2. Choose Your Import Settings
Select the appropriate Import Type and Upload File Configuration for your import.
Once those settings are selected, decide how Workflow should handle any Subject Data that already exists in the Job.
3. Select Merge Subject Data
If the Job already contains Subject Data, select:
Merge subject data
This tells Workflow that your imported data needs to be compared with the subjects already in the Job.
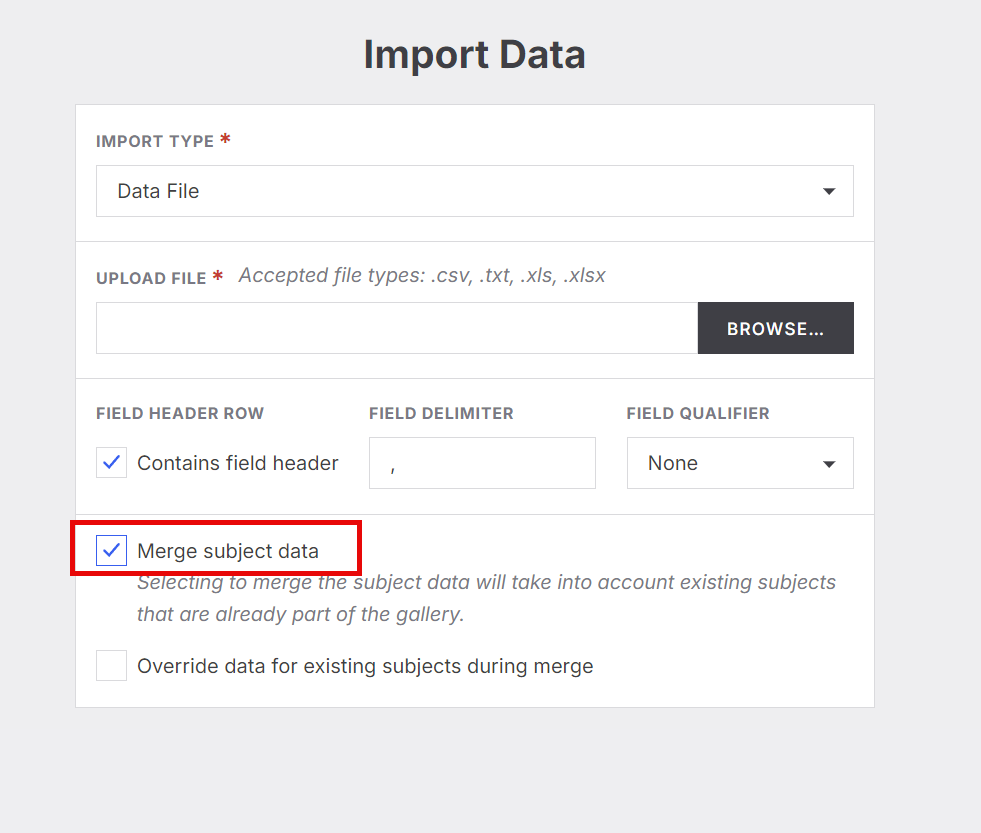
4. Decide Whether Existing Data Should Be Overridden
If you also want the information in your import file to update existing subject records, select:
Override data for existing subjects during merge
Use this when your import file contains updated information that should replace the mapped data currently stored for matching subjects.
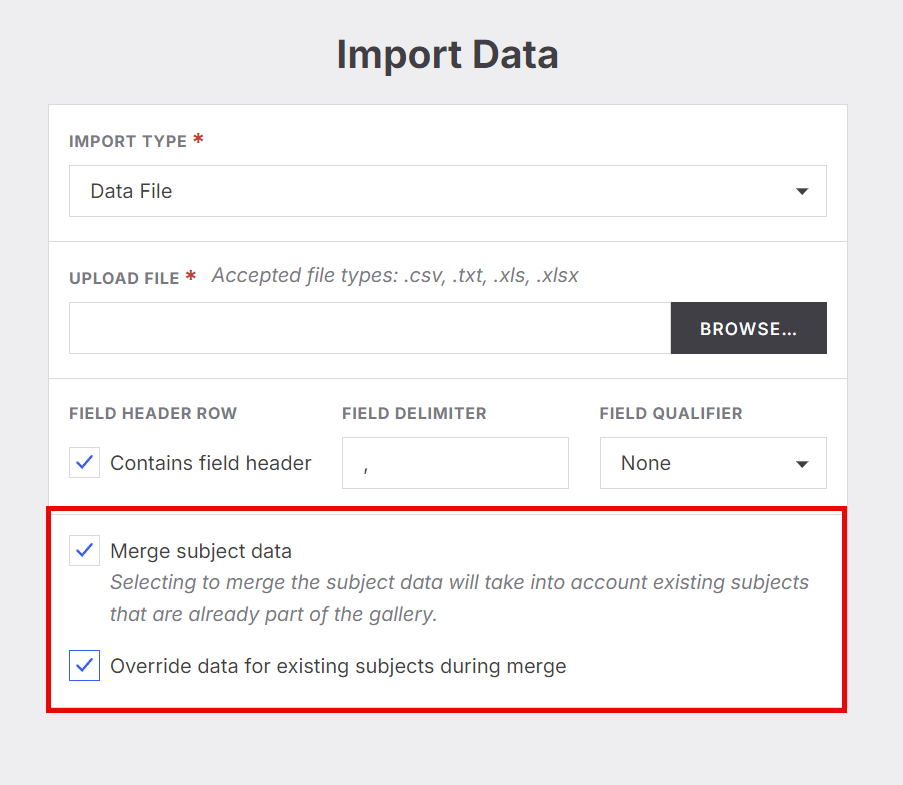
5. Match Your Columns to Subject Data
Continue to the second page of the Import Tool:
Match Columns to Subject Data
Here, map the columns in your upload file to the appropriate Subject Data fields in Workflow.
6. Select a Unique Field
Choose the field Workflow should use to compare your upload file against existing Subject Data.
The Unique Field is an important part of the merge because it helps Workflow identify whether a subject in your file already exists in the Job.
Common choices include:
Online Code
Student ID
Choose a field that contains a unique value for each subject.

7. Complete the Import
Continue through the remaining import steps and review your settings before completing the import.
Once the import runs, Workflow compares the selected Unique Field in your upload file against the existing Subject Data.
What happens next depends on the settings you selected.
Advanced Options/Additional Rules
How Unique Fields Work
A Unique Field gives Workflow a way to identify existing subjects during the import.
Workflow compares the value in the selected Unique Field from your upload file with the same field in the Job.
When Workflow finds an exact match, it knows that the subject already exists.
This helps prevent duplicate subject records from being created.
What Happens With Merge?
When Merge subject data is selected, Workflow checks the Unique Field for each subject.
If an exact match is found between the upload file and existing Subject Data, Workflow skips creating a new subject.
This prevents the import from creating another record for the same person.
What Happens With Merge + Override?
When both Merge subject data and Override data for existing subjects during merge are selected, Workflow still checks for an exact match using the Unique Field.
When a match is found:
Workflow does not create a duplicate subject.
Workflow identifies the existing subject.
Any mapped fields are updated as needed using the information from your import file.
This is useful when you receive updated Subject Data and need to apply those changes to records already in the Job.
Quick Reference
Scenario | Merge? | Override? | Result |
|---|---|---|---|
The Job already has Subject Data and you want to avoid creating duplicate subjects | ✓ | — | Workflow uses the Unique Field to identify exact matches and skips creating a new subject when a match is found. |
The Job already has Subject Data and your file contains updated information | ✓ | ✓ | Workflow identifies matching subjects and updates mapped fields with data from the import file. |
Choosing the Right Unique Field
The Unique Field needs to reliably identify one subject.
For most studios, Online Code or Student ID is a good place to start because these are typically unique per subject.
Selecting the wrong Unique Field can prevent Workflow from matching subjects correctly and may result in unexpected Subject Data after the import.
Something Didn't Go Right?
If your Subject Data or images don't look right after the import, you can revert the Job and attempt the import again.
Before re-importing, review:
The Unique Field you selected
Whether Merge subject data was selected
Whether Override data for existing subjects during merge was needed
Your mapped Subject Data fields
Import issues can often come from selecting the wrong Unique Field or missing the appropriate Merge or Override option.
Common Questions
Q: When should I select Merge subject data?
A: Select Merge subject data when there is already Subject Data in the Job you're importing into.
Q: When should I select Override data for existing subjects during merge?
A: Select Override when the Job already contains Subject Data and you want the information in your import file to update the mapped fields for existing subjects.
Q: What is a Unique Field?
A: A Unique Field is the field Workflow uses to compare your upload file against existing Subject Data. When an exact match is found, Workflow can identify that the subject already exists.
Q: Which field should I use as my Unique Field?
A: Most studios use the subject's Online Code or Student ID because these are typically unique to each subject.
Q: How does a Unique Field help prevent duplicate subjects?
A: During the import, Workflow compares the selected Unique Field against existing Subject Data. If it finds an exact match, it skips creating a new subject.
Q: What happens when I use Override and Workflow finds a matching subject?
A: Workflow skips creating a new subject and updates the mapped fields as needed using the information from your import file.
Q: What should I do if the import doesn't look right?
A: Consider reverting the Job and running the import again. Before retrying, check that you selected the correct Unique Field and the appropriate Merge and Override options.